Tag Archives: sewing

DIY Shoelaces
4.7.2023

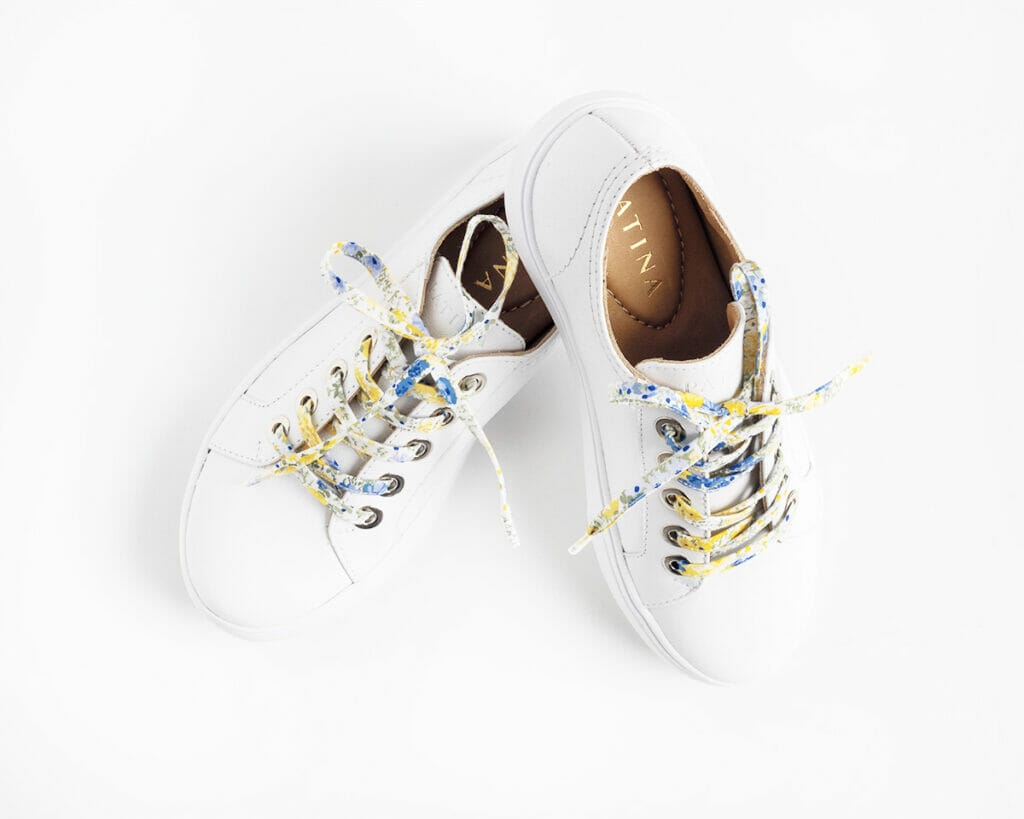
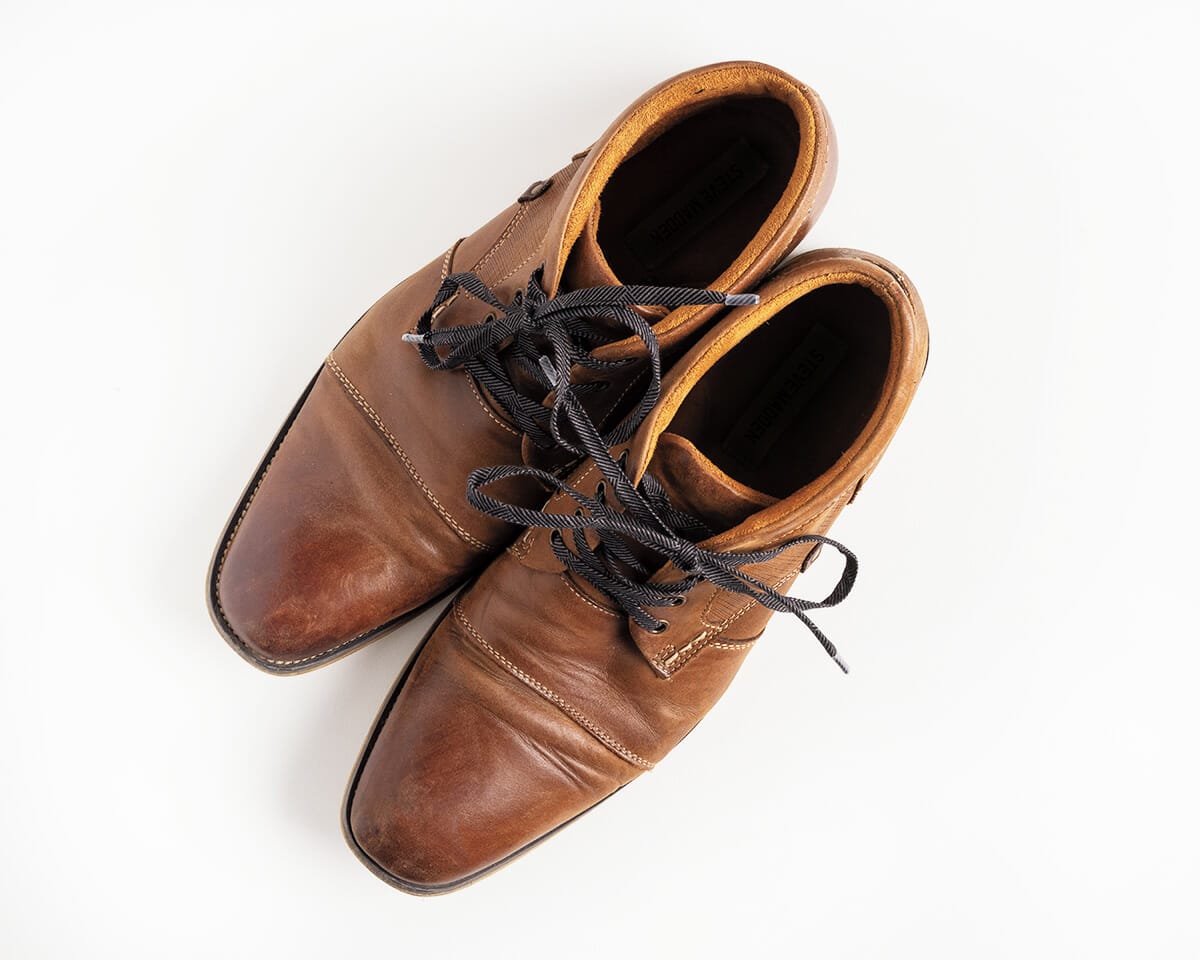
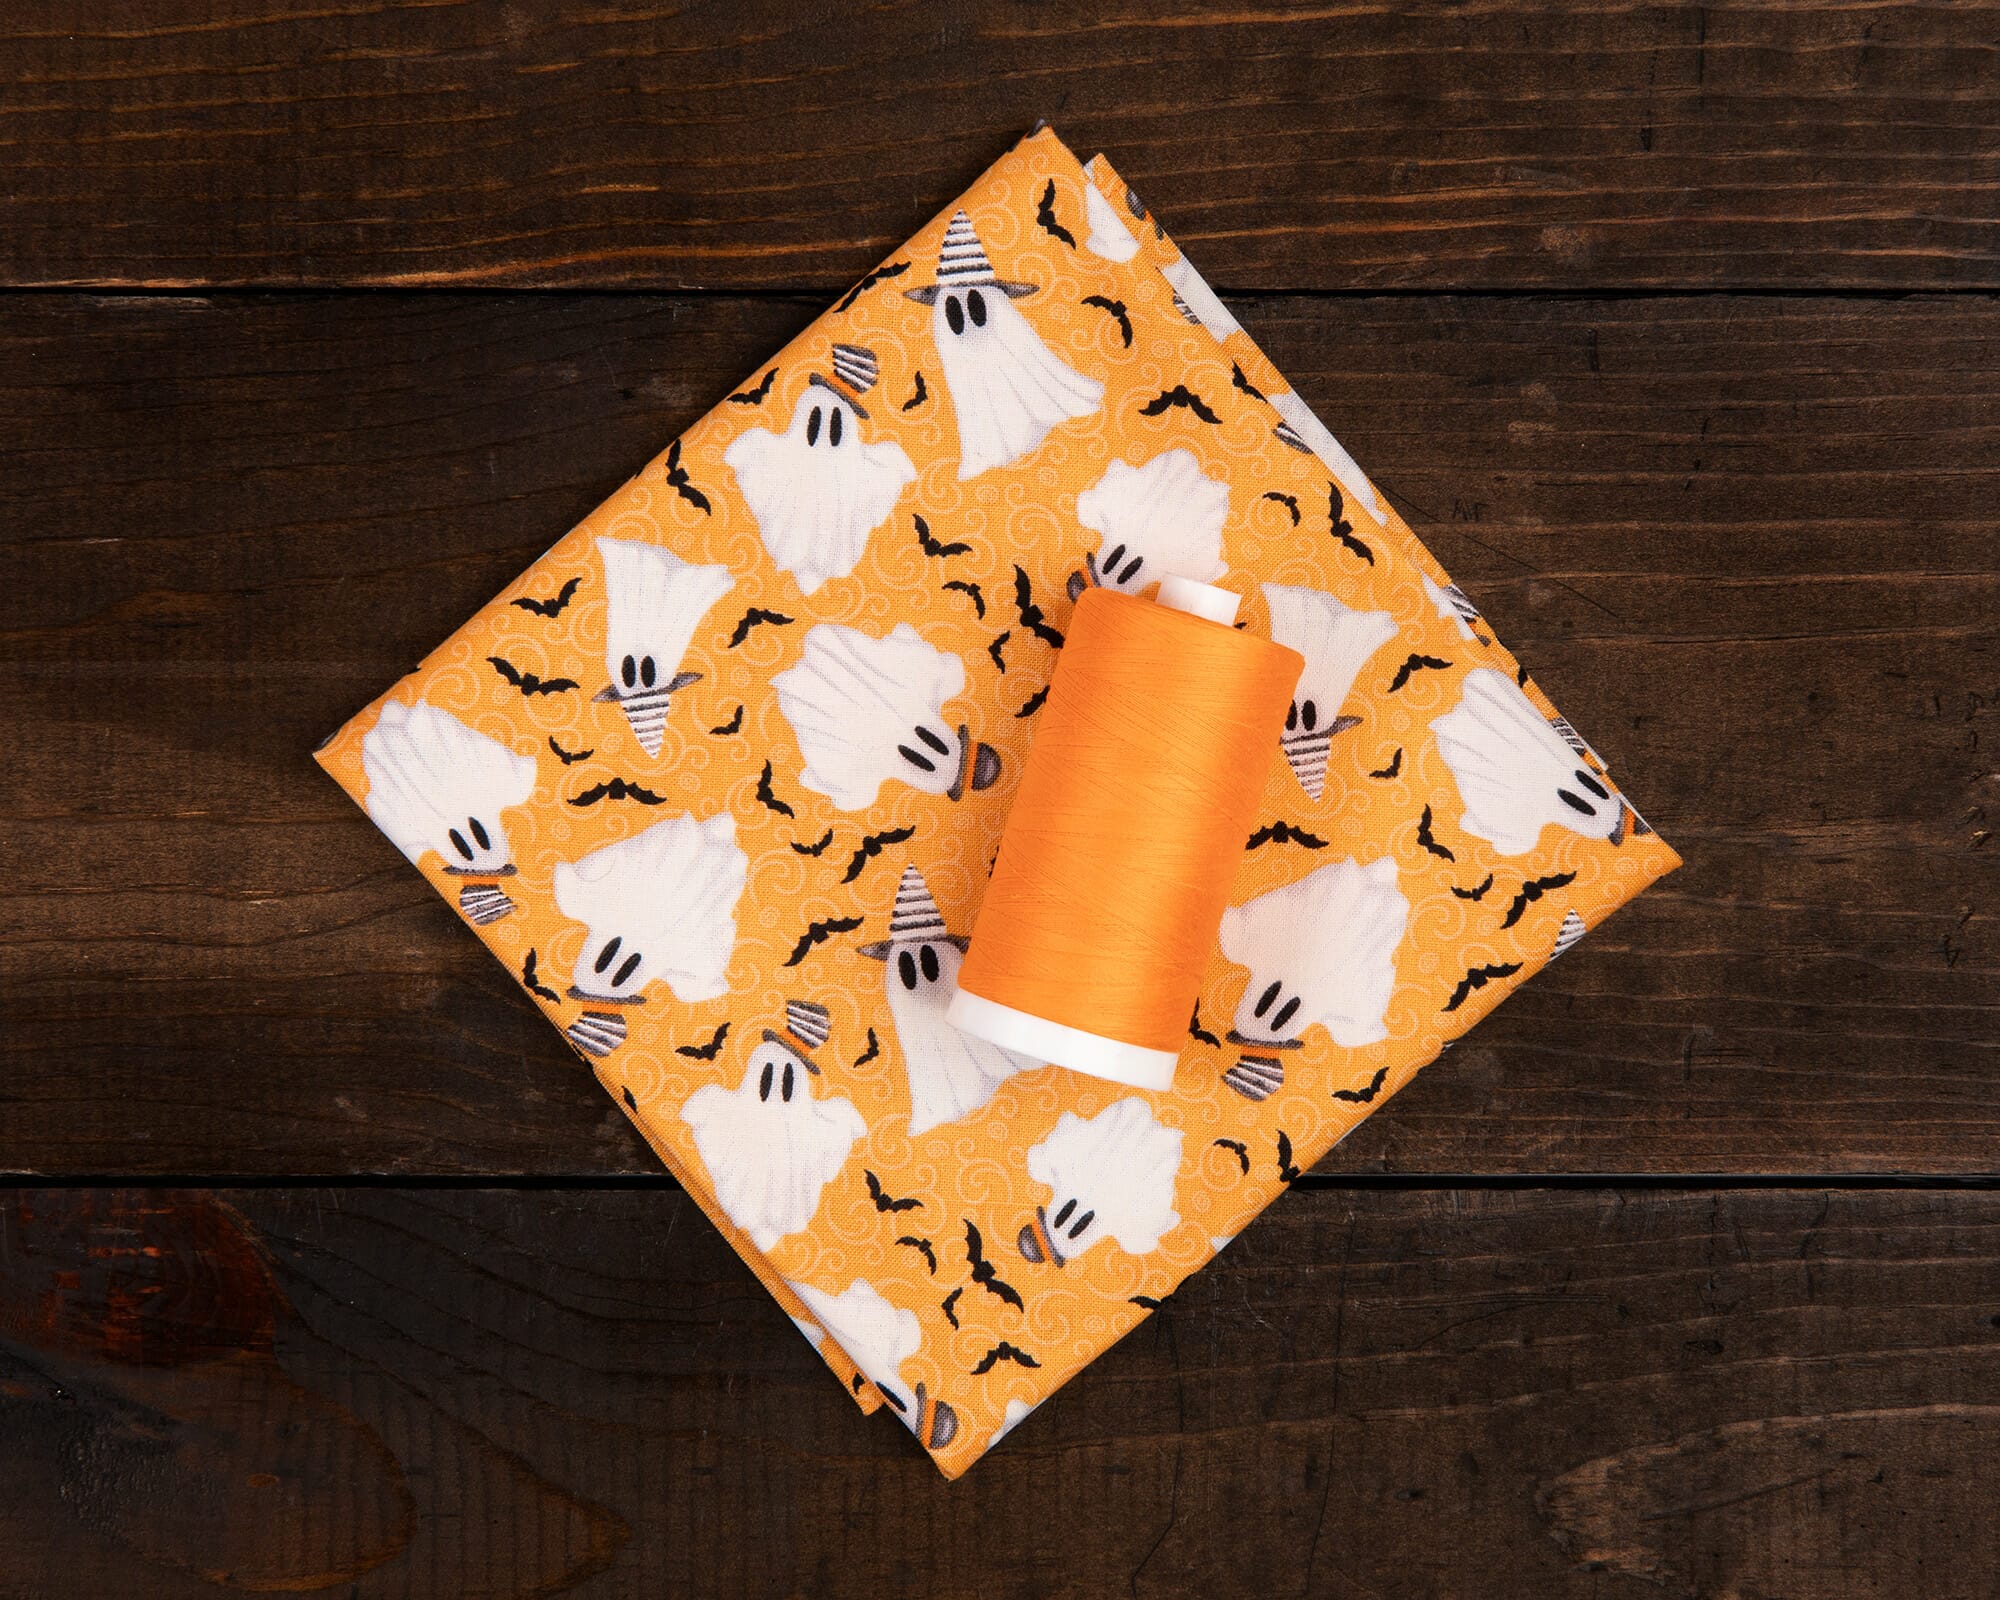
If you have leftover 2 1/2″ strips, sometimes it can be tough to figure out to fit them in with another big project. Maybe you only have 4 or 5 strips leftover, maybe none of them match, maybe they’re a color you don’t typically like in your quilts. Whatever the reason, we have a fabulous project to help use up those leftover 2 1/2″ strips: DIY shoelaces!

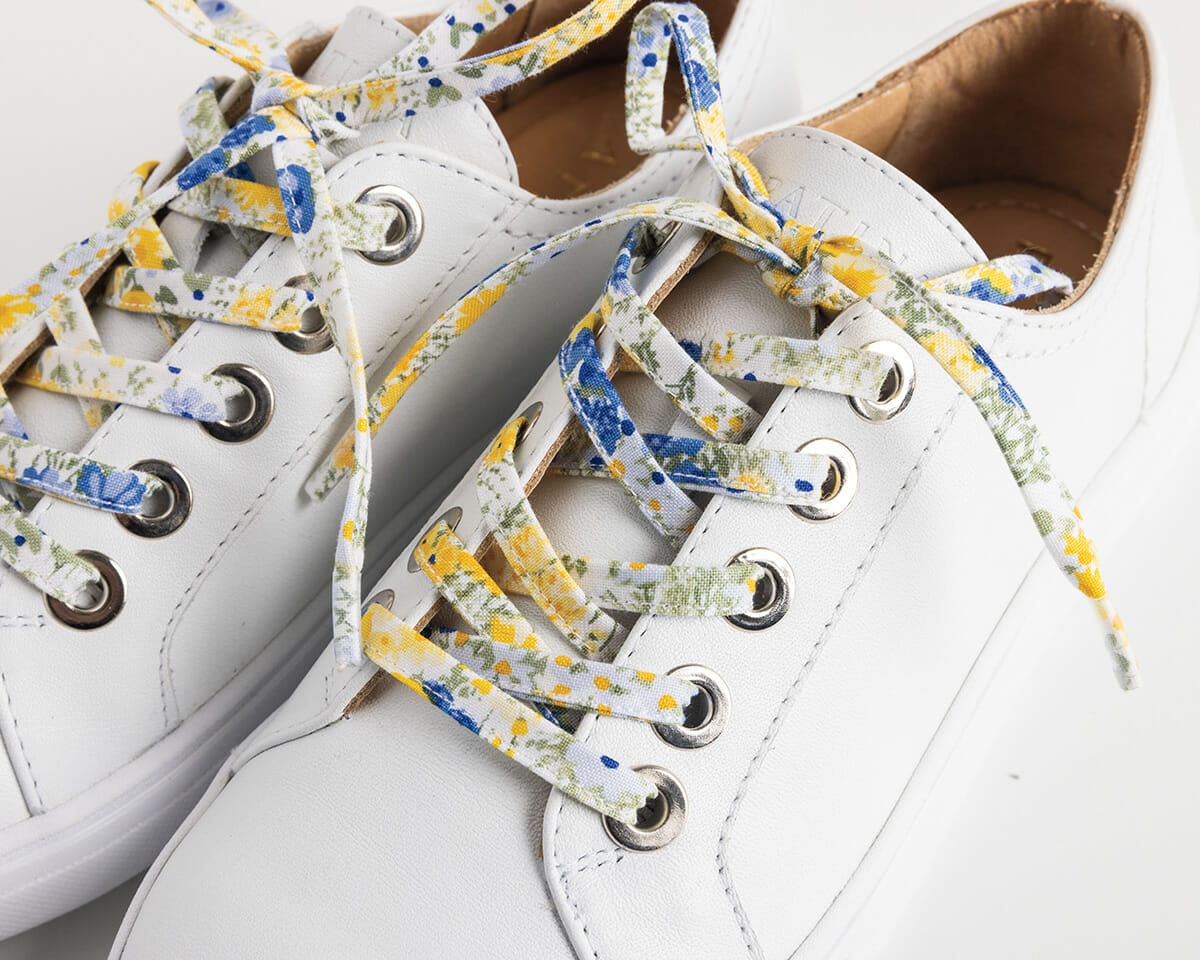
Aren’t these just adorable? Shoelaces are shockingly simple to make, easy to customize and extremely fun to make for loved ones! Let’s jump right in:

First, we need to gather up supplies. In this tutorial, we’ll be making shoelaces that are 3/8″ wide. Madison, our Connecting Threads Marketing Coordinator and sewing superstar, made multiple sizes and we’ll have more information about that at the end of this post. For the purposes of this tutorial, we’ll be talking specifically about the 3/8″ inch wide shoelace.

Here’s what you’ll need:

  • 2 full length 2 1/2″ strips
    • It’s ok if they don’t match! Who says shoelaces have to match?!
  • Transparent Heat Shrink Tubing or Shoelace Aglets of your choice
    • In this tutorial, we’re using this set of pre-cut heat shrink plastic tubing, because they’re perfect for DIY shoelaces!
    • If you’re using heat shrink tubing, you’ll need a heat source to shrink the plastic. We suggest an iron with the ability to steam, a hair dryer or a heat gun.
    • Looking for a more polished finish? Try these DIY Metal Aglets, which don’t require a special tool to install!
  • Bias Tape Maker ¾” (optional)
    • You don’t need to use a bias tape maker, but it’s highly suggested for such small strips. Trust us, it’ll save your fingertips from getting burnt by your iron!
  • Basic sewing supplies
    • Thread
    • Rotary Cutter
    • Ruler
    • Cutting mat
    • Wonder clips or pins
    • Sewing Machine


These were made using a fabric from the Frost and Flourish collection, which is still available as 2 1/2″ strips!

Basic Instructions:

1. Grab your first leftover 2 1/2″ strip and put it on your cutting mat. We’ll be sizing this strip down to 1.5”. Keep it folded in half, to make cutting easier.

2. Line up a ruler, preferably one that’s at least 24” long, with the longest edge of your strip. You want to cut away the pinked edge along one side of your strip (shown in left image). Before you make your cut, line up the fold of your strip to the short edge of your ruler. This will ensure that your strip is straight and your cut line is perpendicular to your fold (shown in right image).

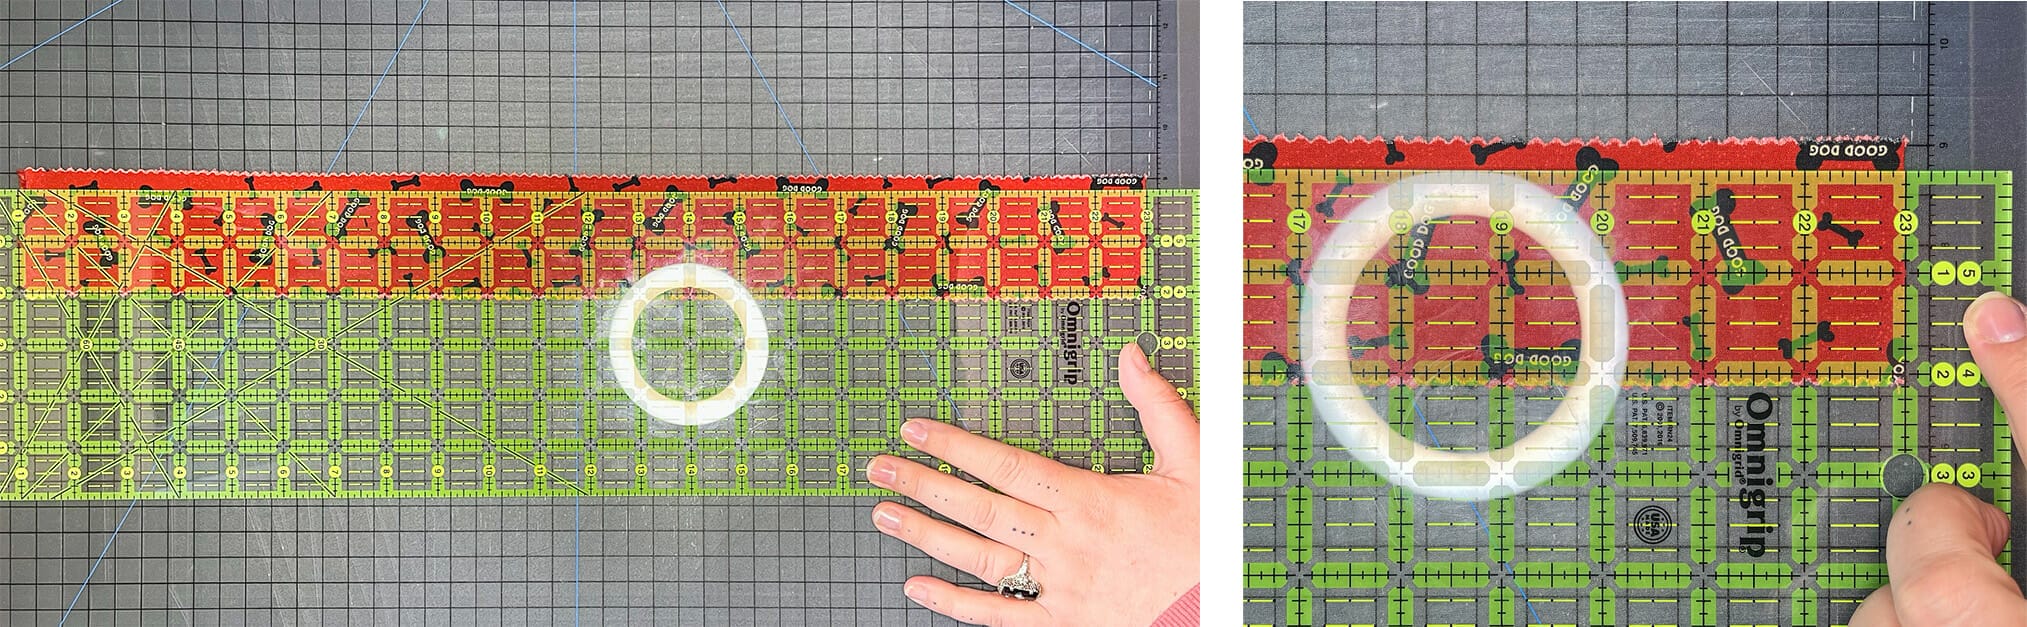
3. Flip over your strip and line up your newly cut straight edge with the 1.5” mark on your ruler. You should now have a 1.5” wide strip!

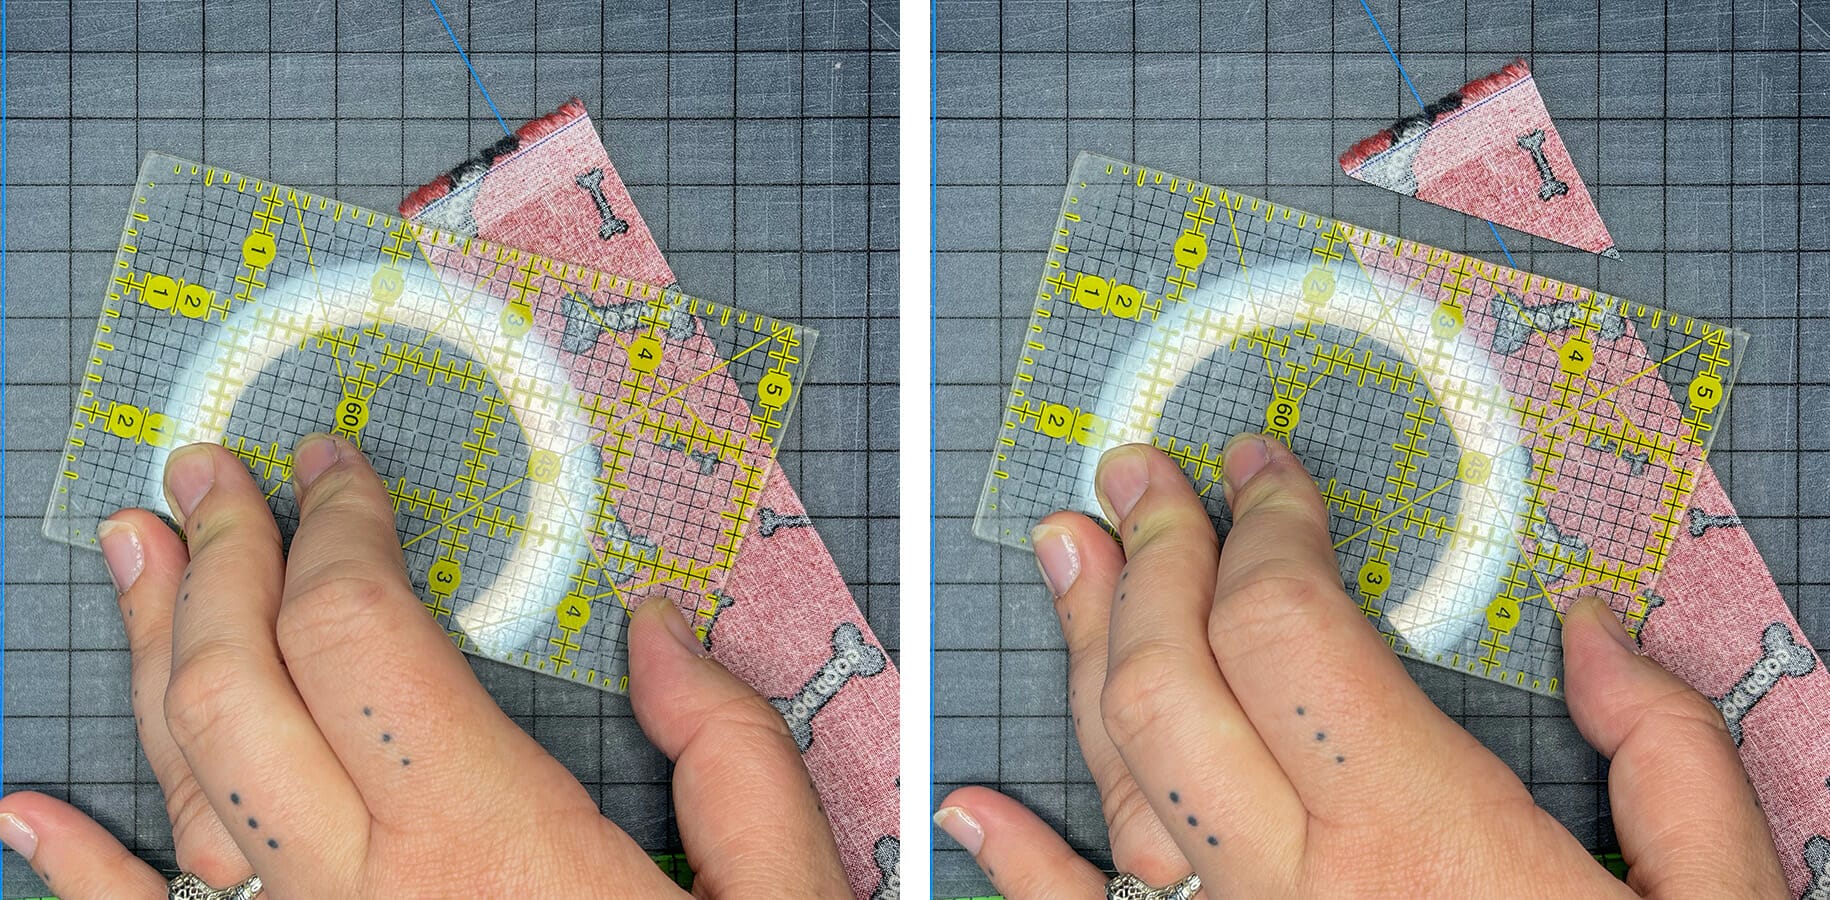
4. To prep your strip for the bias tape maker, I highly recommend you cut one edge of your strip at a 45 degree angle. This makes it easier to push the strip through the bias tape maker. It also helps to have a ruler with a 45 degree marked line, like you can see in the photos below. You line up the long edge of your strip with the 45 degree marker and slice off a corner.

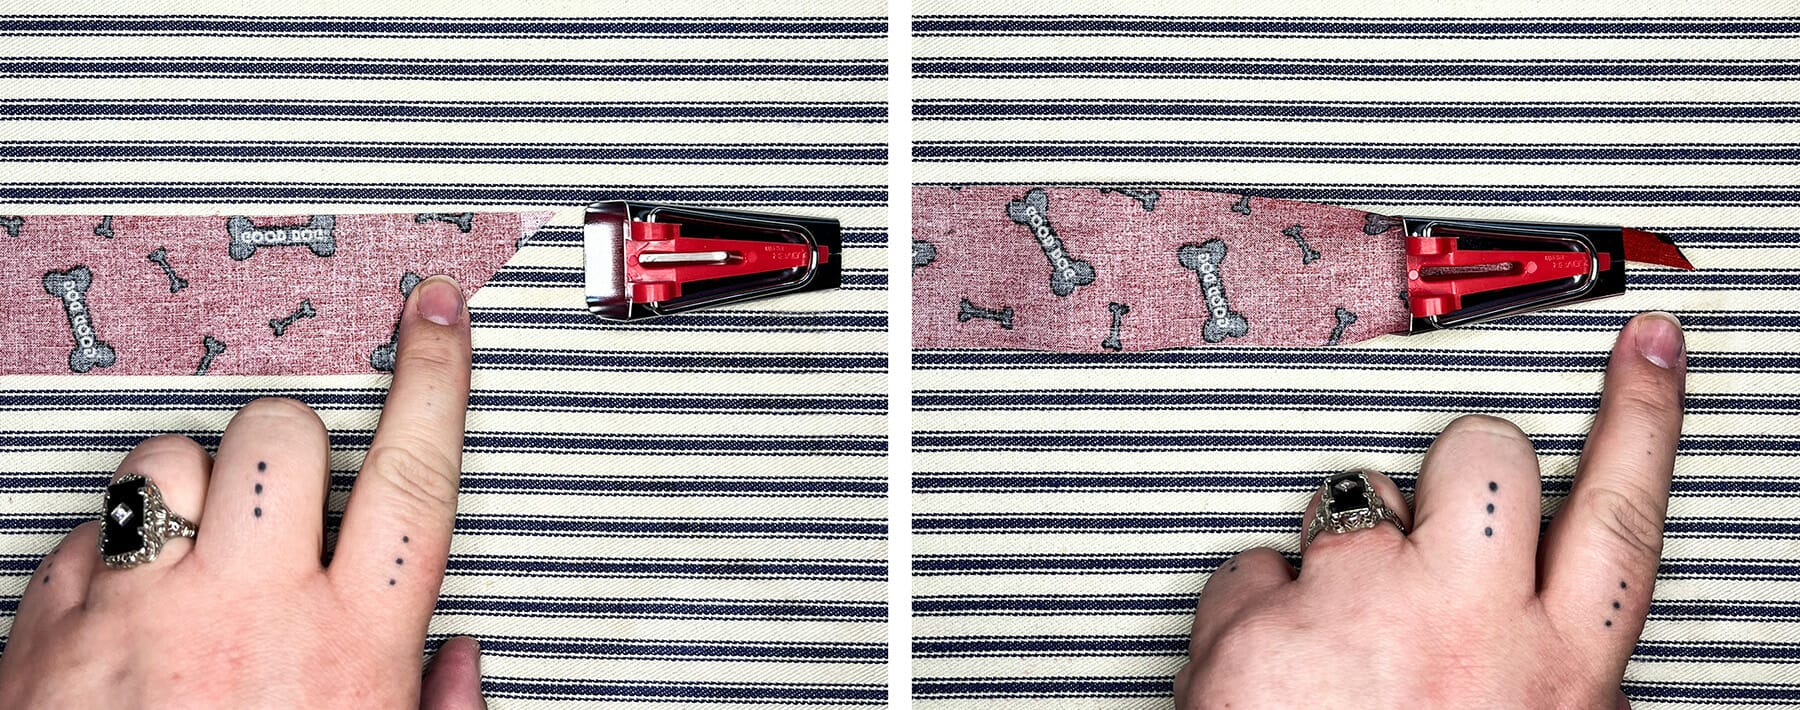
5. Now we feed your strip into the bias tape maker. Take the pointed end that you just created, wrong side up, and start pushing it into the widest end of the bias tape maker. It can take a little finagling, so don’t worry if you have a tough time at first! One way to help coax the fabric into moving is to take a thin, sharp object (like this Clover Curved Awl) You’ll know you’re successful when you see that pointed tip peek out the end – once you do, give it light tug to start the process.

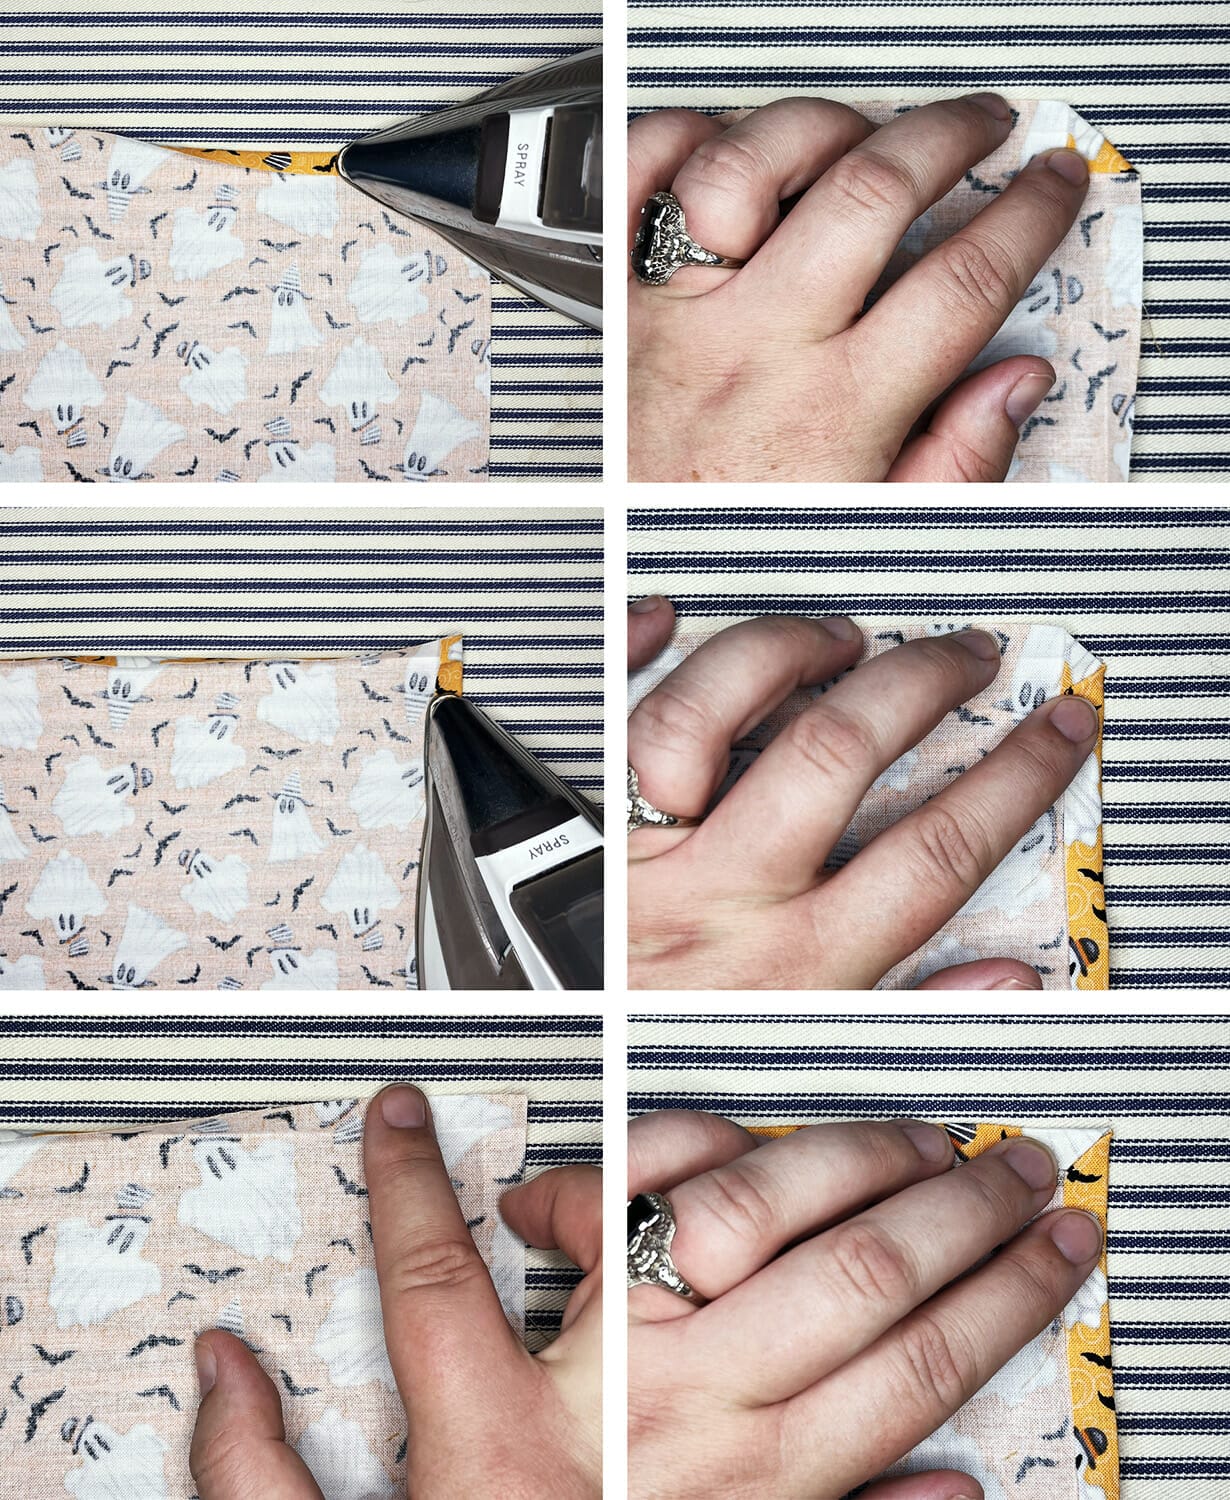
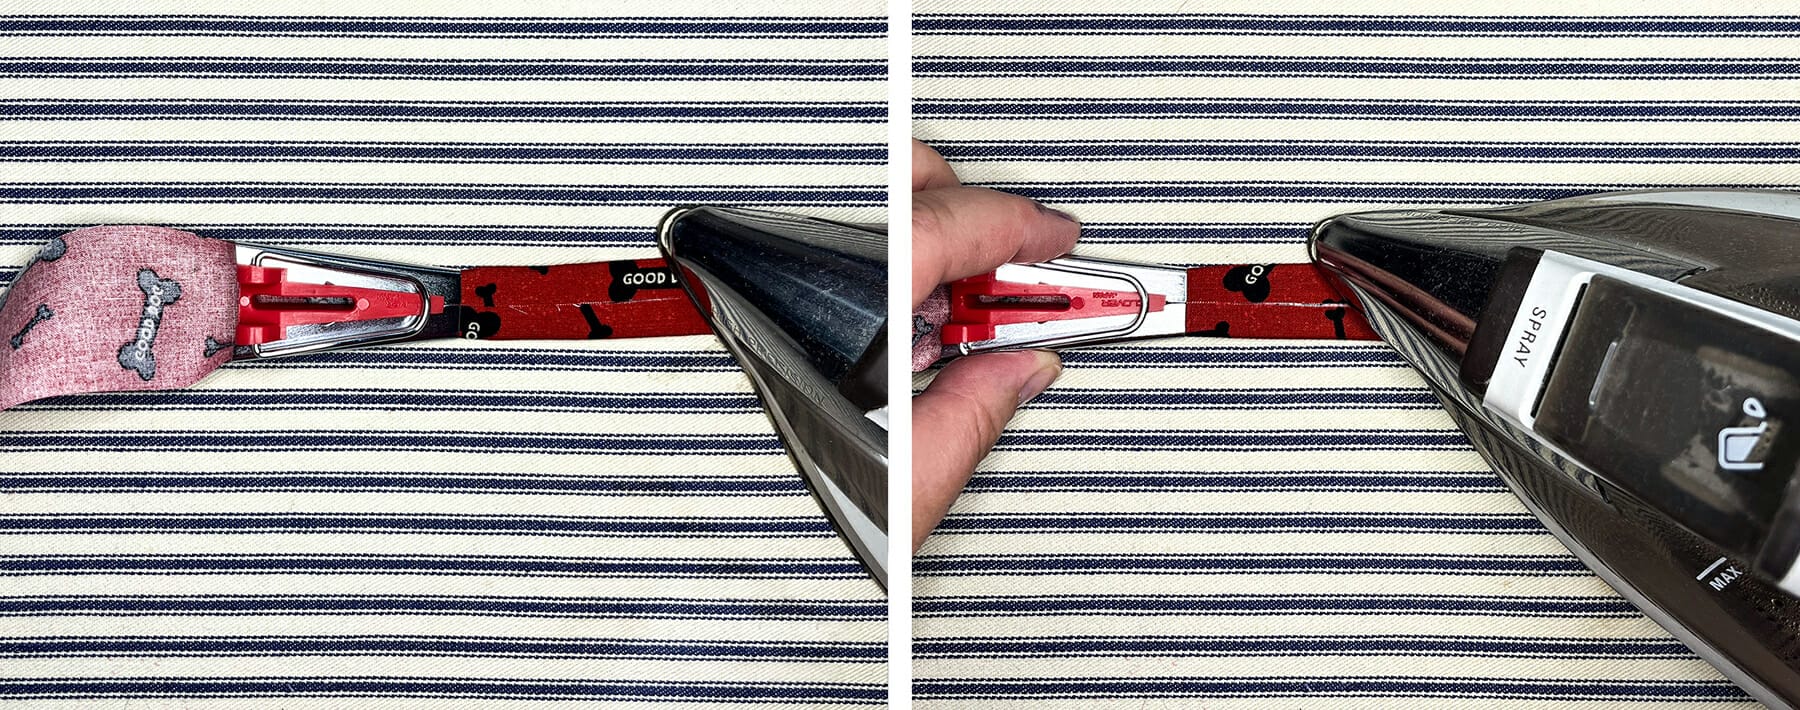
6. As you start to pull your strip through, you’ll see the bias tape maker doing its job. It will create two folds which you’ll want to iron down. I like to press my iron down onto the folded strip, pull the bias tape maker back to create more tape, then iron the next section. It’s best to go slow and steady here.

7. Once you’ve pulled your entire strip through the bias tape maker, you have one last ironing step: you’ll need to fold the entire strip it in half. You’re basically hiding those raw edges inside your new fold!

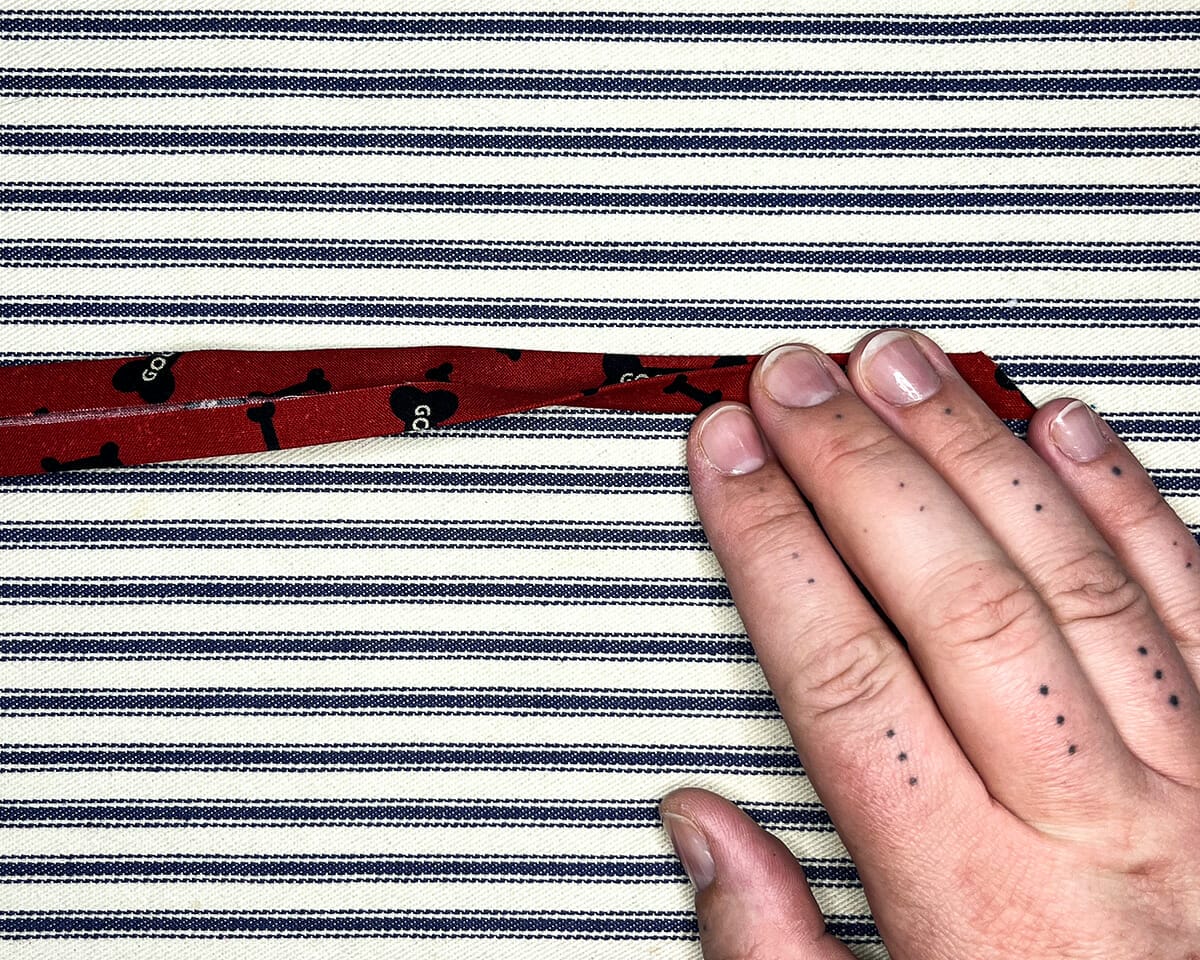
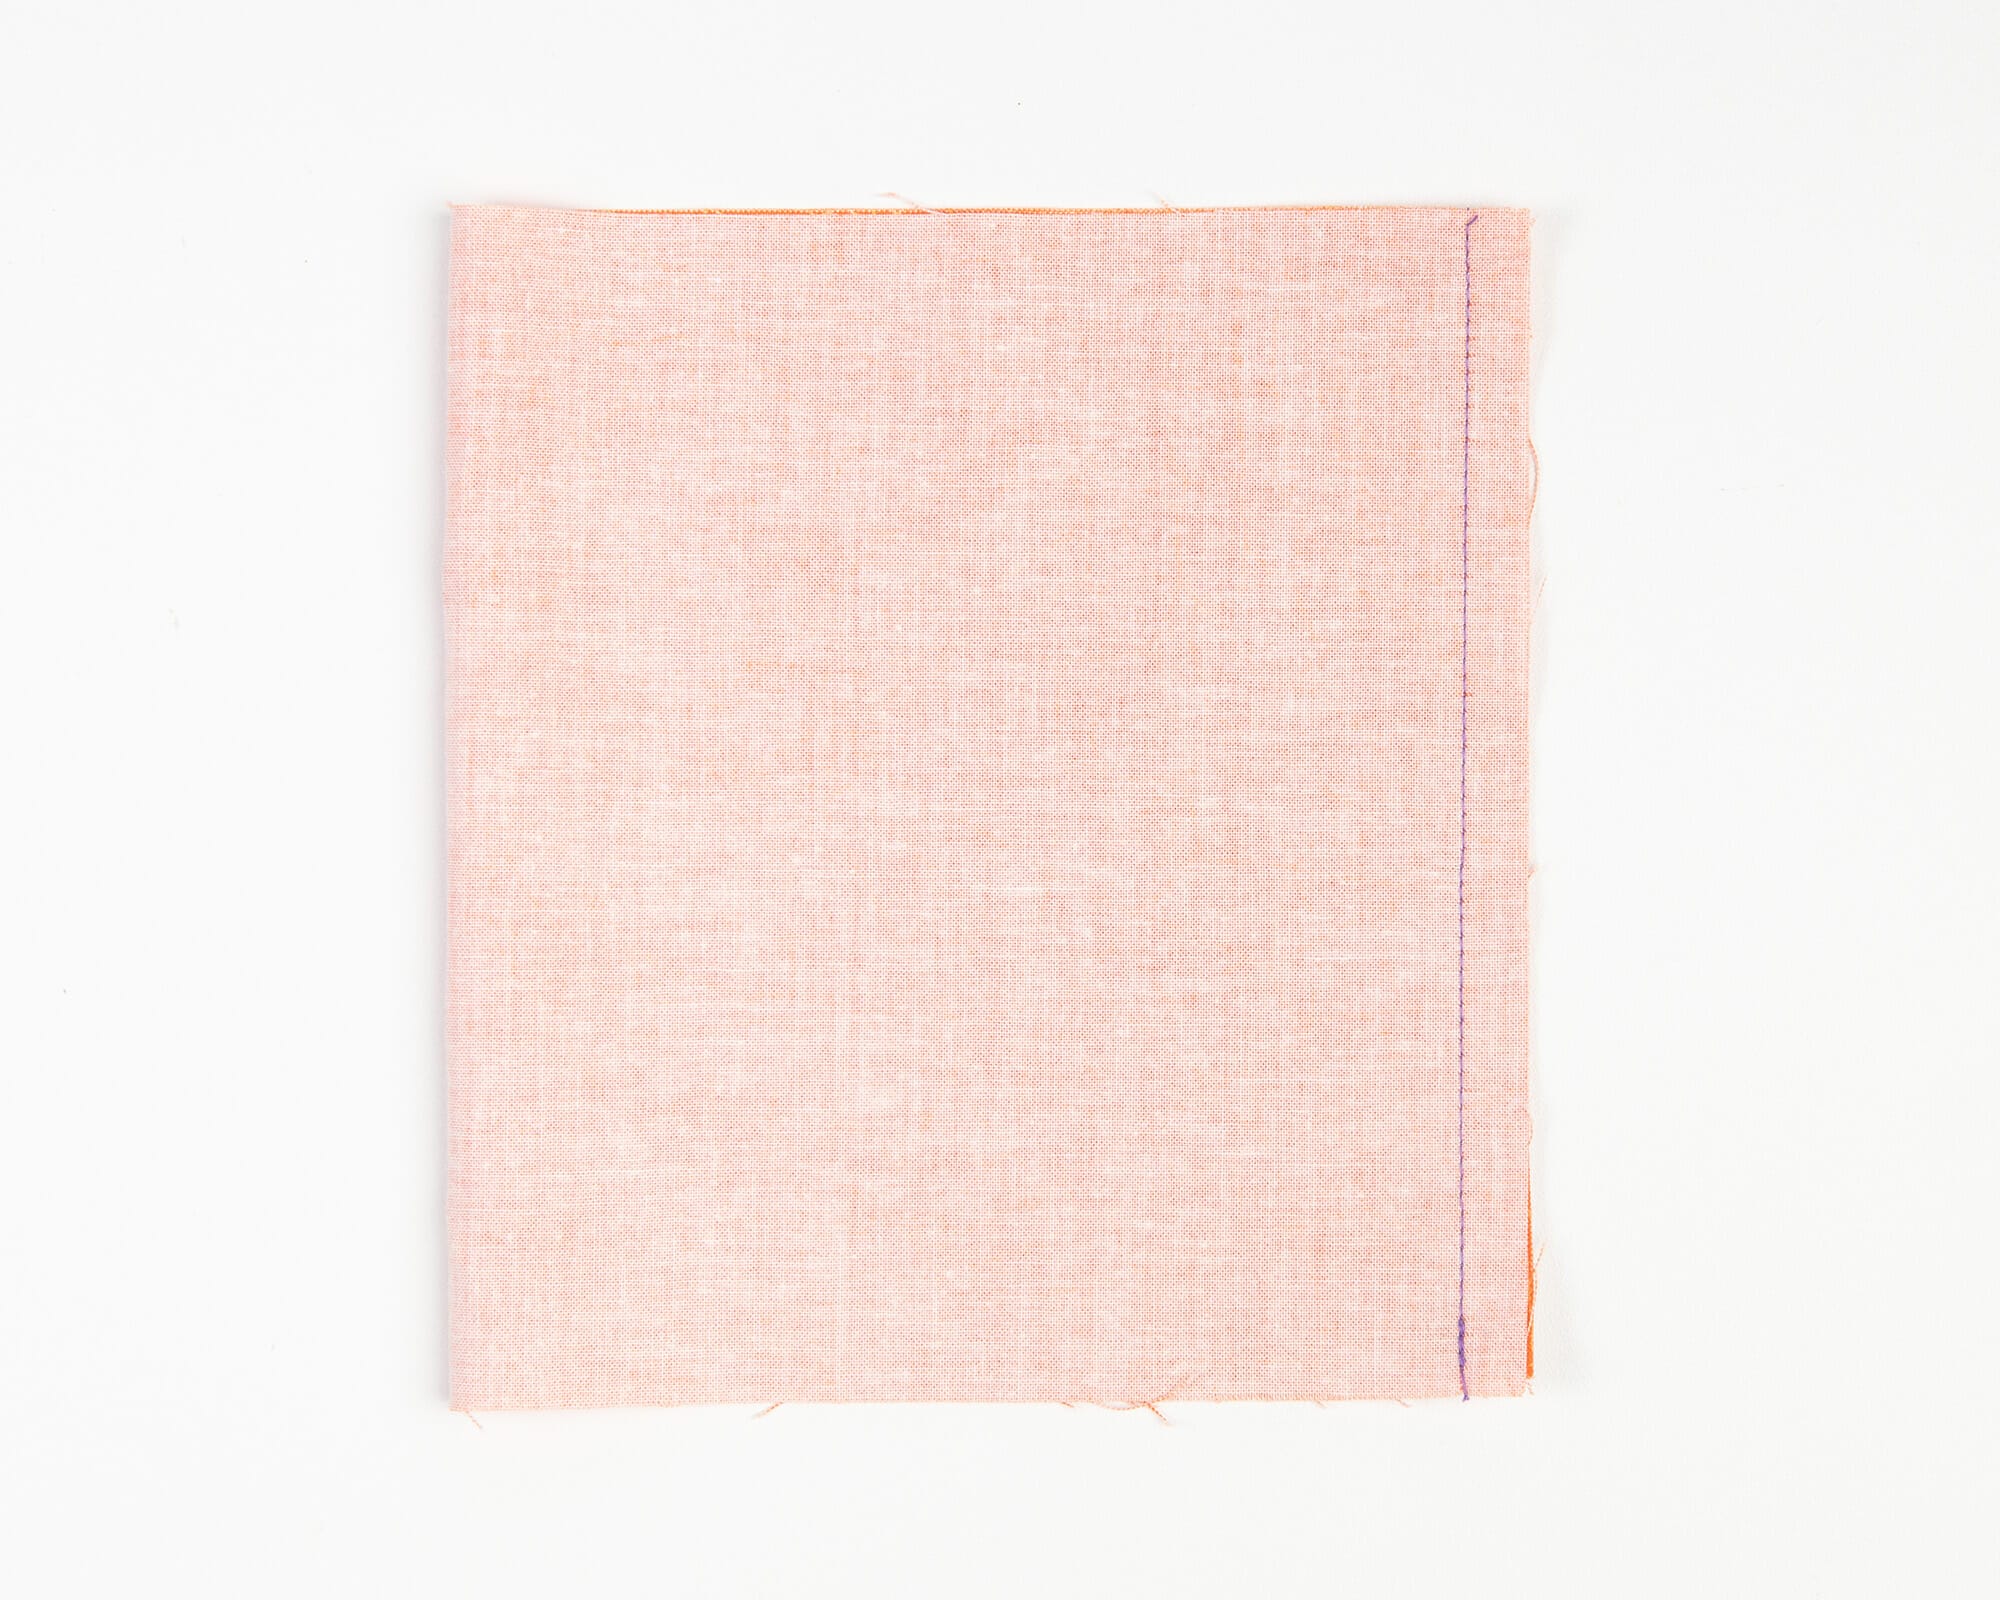
8. Now your shoelace is ready to be sewn. I suggest either pinning or using wonder clips to keep your bias tape folded as you sew. Once it’s secured, you’ll sew as close to the open edge as you can – for me, it was about 1/8”. Sew along the entire long edge of your shoelace.

I’m using Superior Threads’ Metallic Red Thread, just for a shiny and fun addition!

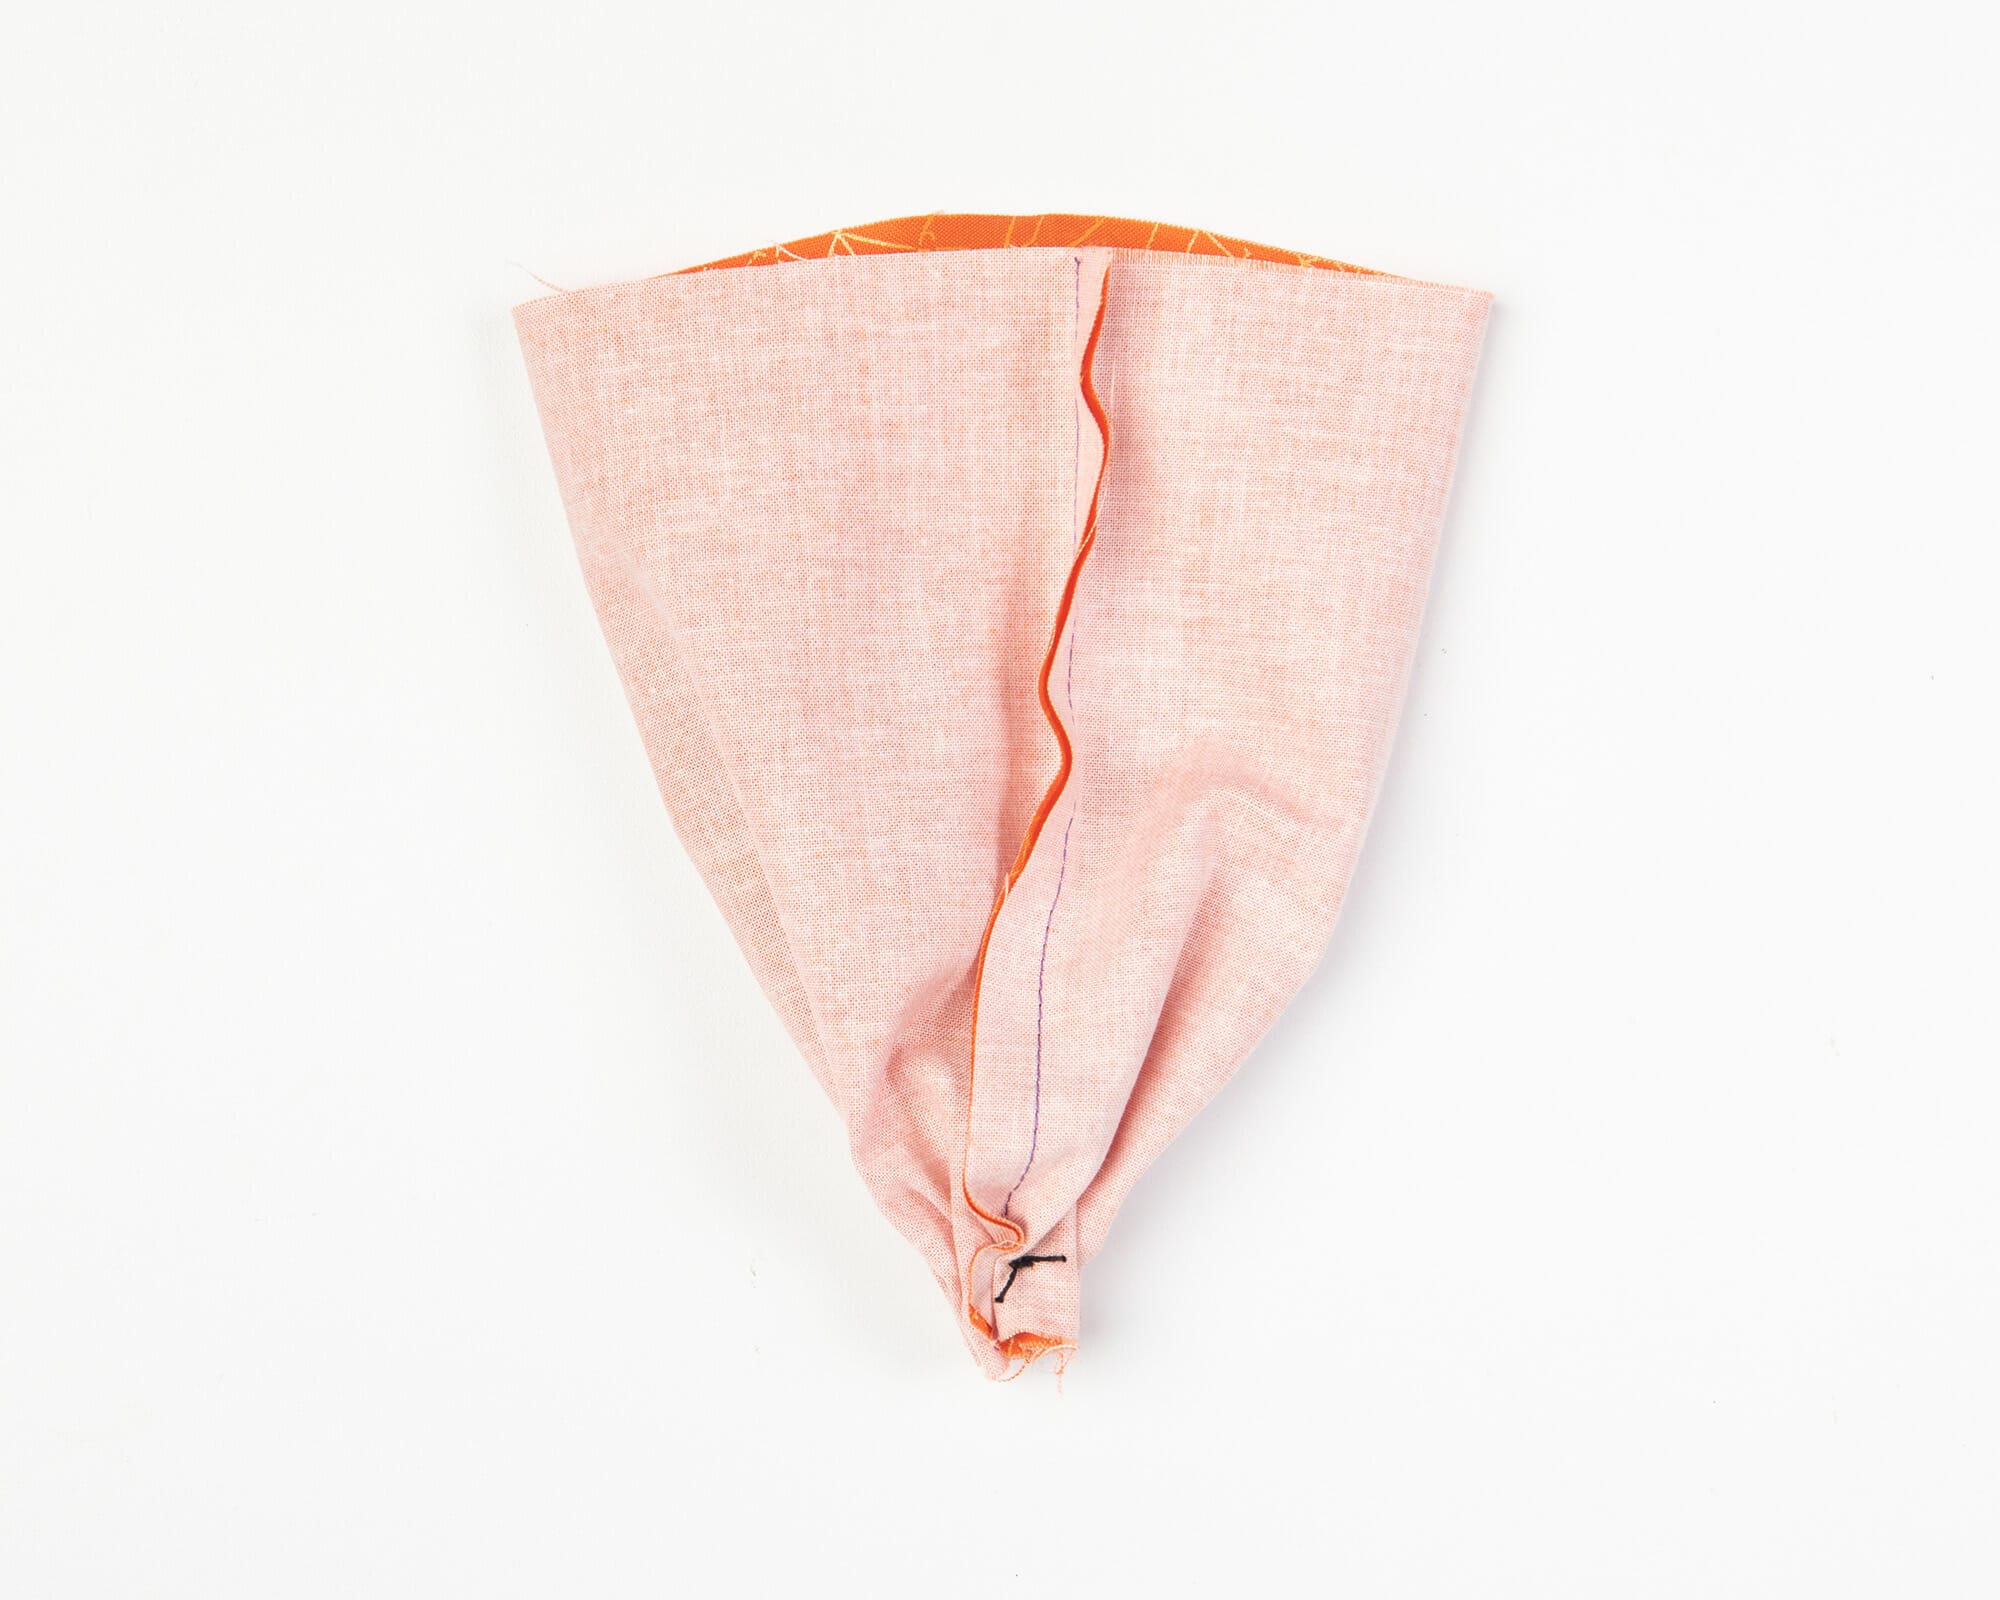
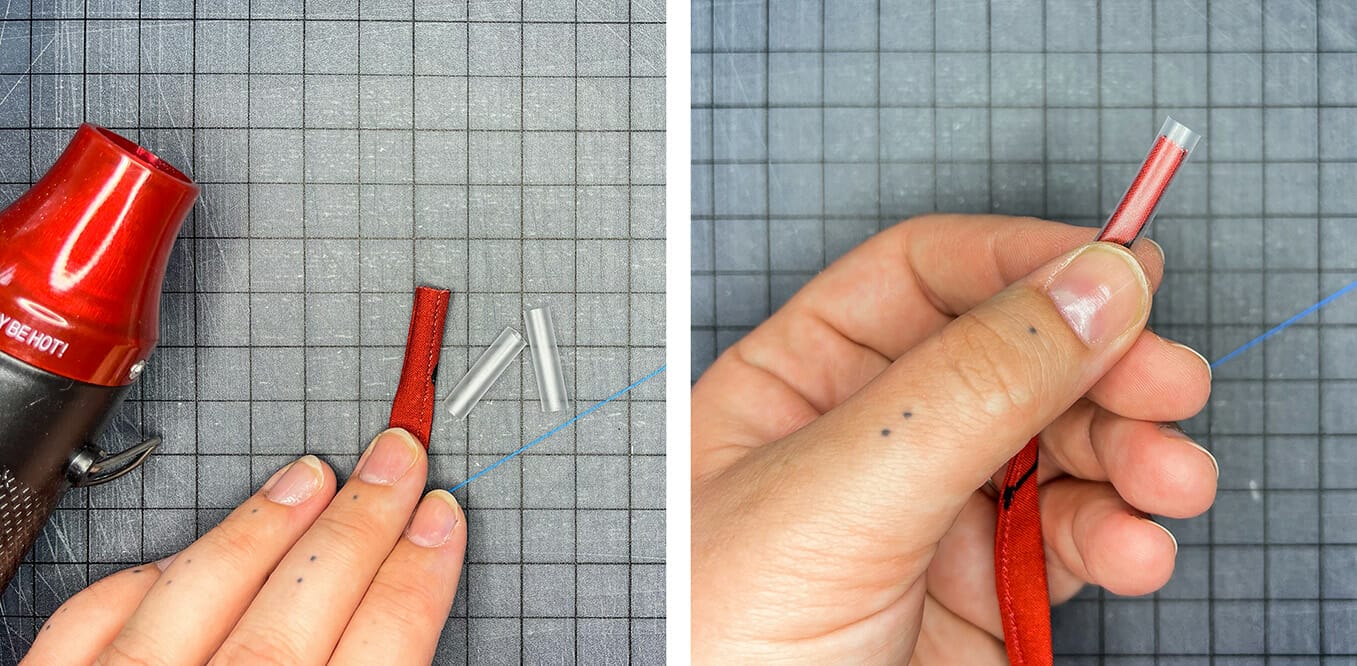
9. Trim one end of your shoelace. Grab your plastic tubing and trim it into two short pieces – mine were about 1”. Fold one end of your shoelace in half to help shimmy it into a piece of tubing. Leave just a tiny overhang of plastic tubing, seen below.

10. Grab your heat source and start it up – I’m using a heat gun. Point it directly at the plastic tubing and begin heating it up. You should see it start to shrink within just a few seconds! Rotate your tubing and make sure to heat all sides until it cinches around the fabric.

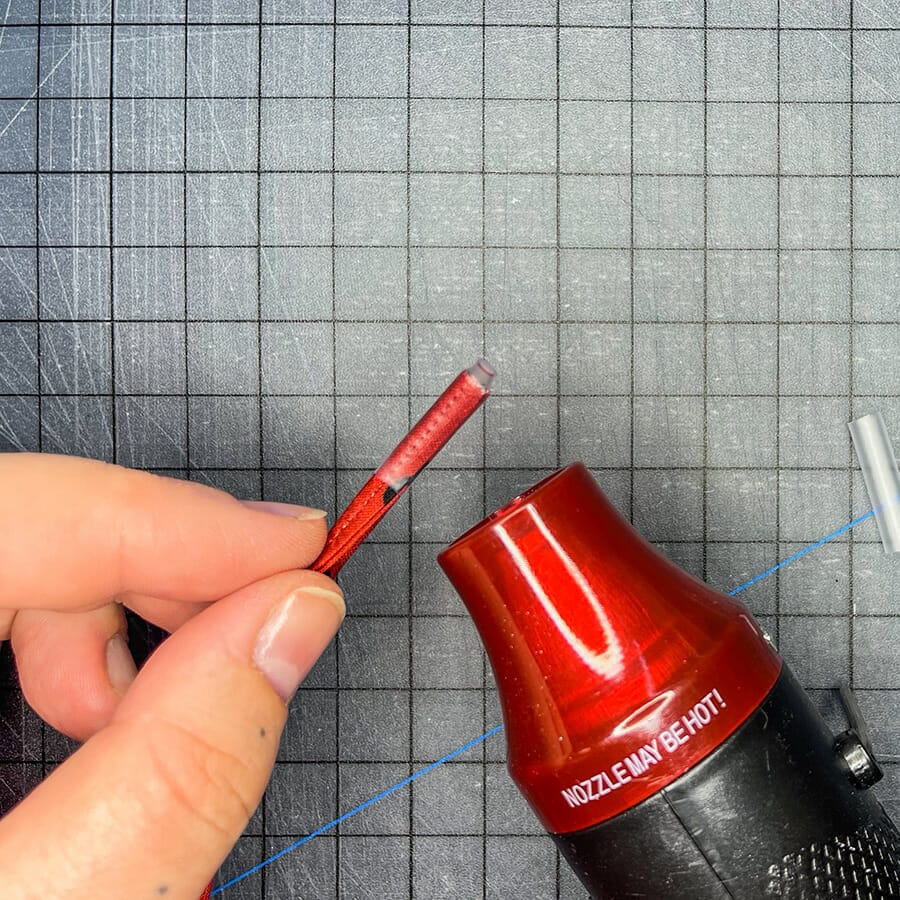
11. Optional: I found that, directly after you turn your heat source off, pinching the overhang of plastic helps create a tighter end to your shoelace. Then you can trim off the excess.

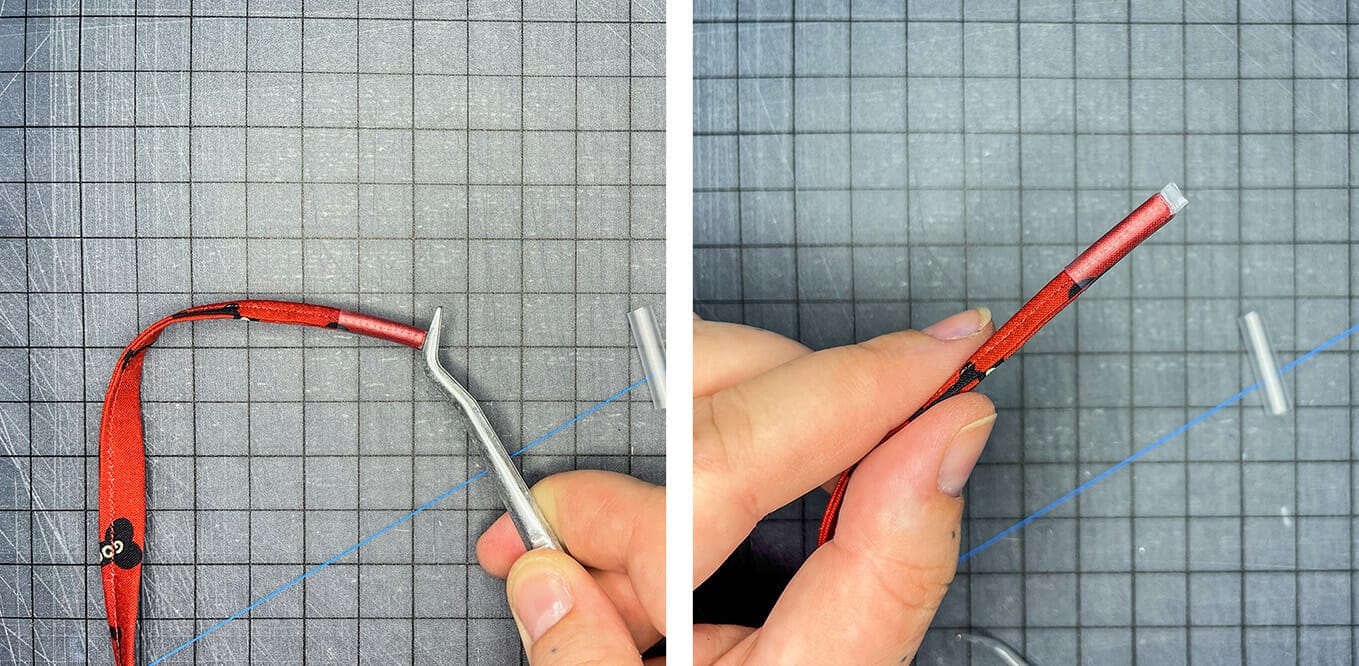
12. Before you repeat the plastic tubing process with your other shoelace end, this is a great time to check the length. If you know exactly how long you need it to be, you can measure it now. If you aren’t sure, I suggest lacing it up into your favorite shoes to see how long it’ll need to be. Once you’ve trimmed off the second end, repeat the plastic tubing process.

13. Voilà, you have a finished shoelace! Start back up at Step 1 and repeat this whole process for your second shoelace. Now that you’ve got a pair, lace up your favorite shoes and you’ll be delighted with how lovely they look!

These shoelaces are made from the Elemental Illusions collection, specifically the Modern Basket Weave fabric.

Plush Dog Beds with Cuddle Cuts
10.29.2022

When I grabbed the sample Cuddle Cuts we received at the Connecting Threads offices, I was so excited to test them out. My mind was a little lost with ideas on how to use them, so I scooped them up and brought them back to my apartment. After opening up a few of the packages and laying out the cuts on the floor, I still was struggling to think of how to show them off: a cuddly quilt or a plush pillowcase? I decided to take a lunch break to clear my head, but upon my return, I got a furry surprise: my dog, Roxie had zonked out all over the cuddle cuts on my studio floor. Thus, the idea for her plush dog bed was born!

There are two simple ways of making this pillow-y dog bed: with or without a pre-made dog bed insert. Let me walk you through both ways.

To make your pup’s new bed, you’ll:

  • A dog bed (option #1)
    • I made two types, using some cheap dog beds from PetSmart. Since we’re covering them up with cuddle cuts, there’s no need for anything flashy! Roxie’s favorite beds are this one and this one.
  • Stuffing (option #2)
    • I used a combination of fabric scraps and polyfill
  • Cuddle Cut of your choice
  • Backing fabric
  • Closure of choice
    • I used two types of closures: a zipper and velcro strips. Totally up to you, but velcro is the easiest option, especially if you hate installing zippers (like I do!).

To make a bed with a pre-made insert:

  1. Measure your bed insert. Roxie’s pillow bed was 33″ x 46″, but yours may vary. With the pillow-style bed, I added 1/4″ seam allowance on three sides, then an extra 1″ on the side where I added velcro. My final measurement came to 34 1/4″ x 46 1/2″.
  2. Cut out your fabric to your desired measurements – one piece of cuddle cuts and one piece of backing fabric.
  3. Placing right sides together, sew along three sides, leaving a short side open.
  4. Along the short side, sew on your velcro. I chose to add it across one whole short side, making it super easy to open and close for cleaning purposes!
    • A tip for sewing on velcro: I had strip velcro, that I cut down into 5″ pieces. Then, I sewed those pieces along the open edge on the RIGHT SIDES of the fabric – that way, when you’ll fold over the right sides to connect the velcro, making for a cleaner closure. This is why we added the extra 1″ to one short side!
  5. Stuff your cover with the dog bed insert, velcro closed and voila! A super adorable, super soft, pillowy dog bed that your pup is going to adore!

To make a stuffed dog bed, the instructions are almost identical!

  1. Figure out the size of your bed. Both versions of Roxie’s bed were around 34″ x 46″ – she’s a medium to large dog and she likes her space, so it worked perfectly. You can choose any size or shape you like, from a basic rectangle to a cute little circle for smaller snugglers!
    • If you’re unsure about sizing (for instance, if you’re making this for a friend’s dog and don’t have a sample bed at the ready), trying looking up dog bed sizes on PetSmart or Petco! You can search by dog size, from small to extra-large, and borrow measurements from the size you choose.
  2. Cut out your fabric to your desired measurements – one piece of cuddle cuts and one piece of backing fabric.
  3. Placing right sides together, sew along three sides, leaving a short side open.
  4. If you’re sewing on a zipper, follow the instructions on the zipper packaging. Never sewn a zipper before? We’ve got some fantastic instructions that you can follow here!
  5. If you’re using velcro, sew it along your short side. This makes it super easy to open and close for cleaning purposes!
    • A tip for sewing on velcro: I had 1″ strip velcro, that I cut down into 5″ stripped pieces. Then, I sewed those pieces along the open edge on the RIGHT SIDES of the fabric – that way, when you’ll fold over the right sides to connect the velcro, making for a cleaner closure.
  6. Stuff your cover with the stuffing of your choice. I chose to use a big bag of fabric scraps along with polyfill stuffing – it’s a great way to use up those weirdly shaped scraps that can’t really be used in projects.
    • A tip on stuffing: a lot of dogs don’t like a bed that’s stiff, as it’s hard to curl up on. Unlike a pillow you’d place on your sofa, which most people like nice and stuffed, under-stuff this bed a bit – that way, your pup can settle in without having to perch atop a tall, stiff pillow!
  7. Velcro or zipper closed and voila! A super adorable, super soft, pillow-y dog bed that your pup is going to adore!

Don’t forget to tag us on Instagram or Facebook with #togetherwequilt so we can see your adorable creations!


Simple Dog Bandanas
10.23.2022

This pup is very excited to tell you all about the easiest 20-minute tutorial ever!

Made from one piece of fabric and the shortest supply list you’ll ever see, creating a bandana for your dog is so simple that it’ll feel like magic. Seen here on scream queen Piper, a medium sized rescue with a penchant for swimming and soccer balls, these pup accessories make any moment festive and extra adorable. (Also, if you’ve ever made a plain cloth napkin, this is the exact same sewing method!)

Grab your rotary cutter, load up some thread and let’s get sewing!


To create a doggie bandana, you’ll only need these supplies:

And that’s it: I told you, it’s the shortest supply list I’ve ever written out!

Once you’ve grabbed your supplies, the first thing to do is to figure out the correct size for your dog. Here’s how I sized mine:

  1. Measure you dog’s neck circumference. I measured Piper’s at 15″.
  2. Since this is just a giant square folded in half, the measurement you need to pay attention to is the diagonal of your square – this is what will wrap around the dog’s neck and tie in the back. You’ll want to pad that neck circumference with a few inches on each side for tying:
    • For smaller dogs, I added 3-4″ on each side (for example, a neck measuring 12″ came out to 18″).
    • For medium and large sized dogs, like Piper, I added 5-6″ on each side (for example, Piper’s neck measured at 15″, so the final measurement comes out to 27″).
    • Use your discretion here – if you want more tying length, add some extra inches! If you’ve got a pretty small pup, like a chihuahua, you may only need to add an extra 2-3″ total.
  3. Equipped with the diagonal measurement of your square, there are lots of ways to figure out the length of the sides. My favorite secret quilting tools are online geometry calculators, because all you do is input a few numbers and you’ve got your block size! Omni Calculator is my favorite and I love using the “Diagonal of a Square” calculator: I put in Piper’s final measurement at 27″ and the size come out to 19.09″. I’ll round that to 19″ to keep things easier on my brain!
  4. Pad that number with 1/2″ to cover your seam allowance and voila! You’ve got the final size of your square.

[If you hate this method, which is completely valid, I have a non-computerized way! Fold your fabric in half, measure 27″ along the fold and mark. Take a ruler with a 45 degree diagonal line like this Omnigrip Neon Ruler and use that diagonal line along the fold. Now you can either mark your edges or just start cutting, no side measurement needed!]

Now that you’ve got the size of your square, cut out your fabric. For Piper, I cut a 19.5″ x 19.5″ square.

Next, we’re going to fold over our seam and sew it down. Since this is a dog bandana, the seam doesn’t have to be perfect: if your dog is anything like mine, this bandana will be dirty in less than 20 minutes! I highly recommend a very simple, single fold hem with mitered corners. It sounds fancy – and looks nice! – but it’s easy as pie.

Here’s a very straightforward way of creating single fold hems with mitered corners:

  1. Fold over 1/4″ hem on one side and iron down.
  2. Fold over 1/4″ hem on a neighboring side and iron down.
  3. Unfold both hems.
  4. In the intersecting corner, fold over that corner. The spot where the two seams intersect should be right on the fold line. Iron down.
  5. Re-fold over one hem and iron it down.
  6. Re-fold the other hem and iron it down. Boom, you have a mitered corner!

This is a wildly simple way of creating a crisp corner, so sometimes you have to finagle that corner into place. Again, don’t worry too much if it’s not perfect!
The last thing to do is sew your hem down. Sew along the raw edges of your hem and drop your needle to turn at each corner.

Fold your bandana in half along the diagonal, iron down the fold and tie it on your pup! Here’s my dog Roxie with her bandana (I made Roxie and Piper a matching pair 😊):

You can use this tutorial with any type of fabric, they make fabulous gifts and they’re so easy to customize! If you’re making one as a gift, here’s a very general neck size guide for dogs:

  • Extra-Small Dogs: up to 20lbs, neck size typically 8″-11″
  • Small Dogs: 20-30lbs, neck size typically 10″-15″
  • Medium Dogs: 30-50lbs, neck size typically 14″-20″
  • Large Dogs: 50-90lbs, neck size typically 18″-26″
  • Extra-Large Dogs: 90lbs and up, neck size typically 20″-28″

These are broad measurements, so if you have the option to measure the dog’s neck, I highly recommend it. If you’re unsure, sizing up is always helpful: longer ties are always better than shorter ones!

Happy sewing and don’t forget to tag us on Facebook and Instagram with photos of your creations! 🐶


Fabric Pumpkins
10.18.2022
fabric pumpkin

Get into the spirit of spooky season with an easy weekend tutorial! Made with fat quarters (or scraps), stuffing and some strong thread, these fabric pumpkins take less than an hour to sew together and look adorable anywhere in your home. Let’s get started!


Supplies (all items shown are linked here and throughout the post):

Iron your scraps and cut your fabric.

The ratio for these fabric rectangles is extremely simple – about 2:1 – so you can adjust it to the size of your choice. That means that the long side needs to be twice as long as the short side. The samples I cut were 16″ x 8″, 14″ x 7″, and 12″ x 6″ (see the orange Quartz Metallic pumpkins in the first photo). If you want your pumpkins to be a bit taller, just pad an extra 1/2″ or 1″ to the short side: 16″ x 9″, 14″ x 7.5″, 12″ x 6.5″ (see the black Bat Lace pumpkins in the first photo, they’re all just a bit taller than their orange counterparts). The size I cut for this tutorial is 12″ x 6.5″.

Fold the fabric in half, right sides together, and sew a seam along the two short sides with a 1/4″ seam allowance. You’ll have a little tube like this:

Next, we’re going to sew the bottom of the pumpkin closed. Grab your darning needle and load it up with about 12″ of the Perle Cotton thread. Along the bottom edge, start stitching 1/2″ away from the edge, with a stitch every 1/2″ or so – nice big, wide stitches to create a gathered bottom edge:

Once you’ve stitched through the entire bottom edge, you’re going to cinch it nice and tight (it’s why I recommend the thicker thread here, so you can really pull those gathered stitches together). You should have something that looks like this:

Turn your pumpkin right side out.

Now you get to start stuffing! Take your poly fill and start cramming it in there, really making sure you get deep in those gathered crevices at the bottom. The more you stuff the pumpkin, the tighter it will look at the end.

Next, you need to gather the top edge. Load up your darning needle with a long piece of thread – I tie off the top and then create the ribs with the same piece of thread, so it’ll need to be long enough to create the indentations. Mine ended up being about 30″ for a 12″ x 6.5″ pumpkin. Just like you did before, you’re going to create 1/2″ wide stitches about 1/2″ away from the fabric edge. It should look something like this:

Now you’ll need to cinch the top closed. This can be a bit tricky, especially if you’ve really stuffed this little pumpkin! Start by pulling it tight and start your knot – just one crossover of your thread – and pull it even tighter. This will make it easier to finish your knot and keep it taut.

As you’re pulling it, start tucking in the top gathered seam into the opening. I like to use the end of a pen or the Purple Thang (the best multi-use tool ever!) to push those gathered edges inside the pumpkin. Tie it off as taut as you can, but don’t worry too much if it’s got a teeny little opening left at the top – this is where you can put your stem and no one will ever know! 😉 Leave a nice tail too, this is where we can tie off our thread at the end of the tutorial.

Then, we create the ribs. I like 5 of them evenly spaced throughout, but I tried 4 and 6 ribs: both looked cute! Take your darning needle and punch it down the center of your pumpkin.

If you have a tall pumpkin with a shorter needle, you may need to squish it:

I like to use a rubber thimble (like these) or a rubber needle gripper to help pull the needle through the pumpkin. Pull it taut, then thread it through the opposite end again. Repeat this 3 more times until you have 4 ribs. On the fifth rib, tie off your thread with the leftover tail. I like to thread my needle through a notch at the opposite end of the pumpkin to help stabilize my knot when I tie it off. Grab the leftover thread – cut it off or tuck it into the pumpkin.

Next, we create the stem. If you’re using a cinnamon stick, just cut it to size and wedge it into the top of your pumpkin. You can add some liquid fabric glue here to stabilize it, or not: I had success with the stick staying on with both methods.

To create a flannel stem, cut off a 1.5″ strip of the edge of your 10″ layer cake square. I love the 10″ Woolie’s Flannel square because of the pinked edge: it looks so great as the top of the stem! You can also cut a piece of flannel or felt to 1.5″ x 10″.

On the wrong side, add a little glue to one end.

Fold over a little edge and press it down.

Now I like to glue a little bit, roll a little bit, then rinse and repeat until it’s about the size I want. Cut off any excess fabric, add some glue to the end and roll it around the edge.

Take your scissors and cut a small V shape at the bottom of the stem: this really helps you nestle the stem into the center of the pumpkin. It’ll look something like this (now is the time to shorten your stem if you think it’s too tall!):

Add some fabric glue to the bottom of the stem and put it in the top center of your pumpkin. You’re done!

Congrats, you made an adorable fabric pumpkin! If it’s a little wonky, it’s easy to adjust: you can move around the stuffing and modify the position of the ribs.

We can’t wait to see what combinations you come up with and don’t forget to tag us on Facebook and Instagram so we can see your creations! Happy Halloween! 🎃


Open Skies BOM – Month 2
5.2.2022

Hey friends!

It’s been so fun to see everyone’s first blocks on the facebook group. Keep up the good work!

This month we will be doing just two blocks, and 8 sashing strips.

Our two new blocks have one thing in common – Square in a square units. Personally, I have a love/hate relationship with these little guys. I love how they look, but getting them the right size can be tricky. In fact, as I was sewing up these blocks I was seriously questioning my design choices, and wondering what on earth possessed me to do this to all of you. But it’s skill building, right?!

 If I have one piece of advice for making these it’s this: Accuracy in cutting the center square is crucial, but the outer triangles that you’ll attach can be cut bigger than needed, and then trimmed to size after they are all sewn on.

Another tip – STARCH! Any time I’m sewing pieces that have been cut on the bias, using extra starch just helps to keep them from stretching or getting wonky.

Ok, let’s get started!

Block #2

We’ll begin by making a pinwheel unit from four Half-Square triangles. Again, feel free to cut your D and E squares a bit bigger if you like, so that you can trim these down to size. And I know that 3-3/8” HSTs is a weird size! Trust me, it works out.

Make sure your completed pinwheel measures at 6-1/4” square.  This is key.

Next, you’ll sew on those well starched triangles. If you are having trouble figuring out where to line up your triangles, use the pinwheel as a guide. The point of the triangle should line up with the seam of the pinwheel, like you see in the photo below:

Do this for all four triangles as you sew them on, one at a time. Acutally, I usually pin mine on two at a time and sew accordingly, even though the directions say otherwise.

Once all the triangles are sewn on, then trim the unit to 8-1/2” square. If it’s done correctly, you should have the proper ¼” seam allowance to make sure you don’t sew off any of your pinwheel points.

Now all we have to do is sew the same border pieces as we did last month, and then attach them to the pinwheel unit to complete the block. If you need a refresher for how this is done, please take a gander back at the month 1 blog post. I also found it helpful to pin the border pieces on the under side so that I could see where the pinwheel intersects on the edges. I always find this helpful so that I can avoid sewing off my points.

In fact, if you look closely at the photo above, you can see that I had to rip out my first stitches and re-do them, because I had, in fact, cut off the point on this side. Ugh!

And here is the finished block!

Block #12

This block is just a sawtooth star that has a diamond (square in a square) unit in the center. Since there are so many triangles coming together in this block, things can get a bit bulky at the seams. If you don’t like all the bulk, feel free to press all your seams open. Personally, I’m kind of obsessed with nesting seams, so I ironed according to my directions, which created a bit of bulk around the center diamond square. I just starched and pressed the heck out of it, and mined turned out pretty flat. But it’s whatever you prefer. Remember, it’s YOUR quilt, and there are no rules, only suggestions!

First we will make that square in a square unit as I mentioned earlier, making especially sure that your center D square is cut accurately. You could cut your E squares at 3” and then trim the unit after sewing all the triangles on, if you prefer.

I always find it helpful to fold the center square in half and finger press a seam down the middle, so that I can have a guide to line up the point of the triangle before pinning.

You can’t see it in the photo above, but I promise there is a folded line down the center of the square that I’ve used as a guide to place the triangle before pinning. You want the point of the triangle to be on that line.

Next we will make four HST’s. Apparently I neglected to take a photo of these, but I think you all know how to make them.

Last, but not least, we will make some flying geese. Usually my patterns have directions for no-waste flying geese, since they are my FAVORITE! But after getting a lot of feedback from customers, I decided to just use the simpler stitch and flip method with this pattern, especially since we don’t make that many in the quilt. And to be honest, I felt a little out of practice!

For those wanting to do the no-waste method, you’ll need to cut one 5-1/4” square from the Droplet, Lt. Denim fabric, and four 2-7/8” squares from the Soaring Leaves, Prussian Blue fabric. For anyone unfamiliar with this method for making flying geese, just look up No Waste Flying Geese on the internet, and you’ll find multiple tutorials.

A little tip for the stitch and flip method: I find it helpful to sew just BARELY outside (the side closest to the corner) of the line, so that I don’t end up with my corners coming up short. And by barely, I mean a thread or two. But again, it’s a suggestion, so you do you!

This photo isn’t the greatest, but I’ve got everything marked and pinned.
The second set of squares are ready to be sewn and trimmed.

Now it’s time to assemble the block. I always lay everything out and double check that I haven’t flipped something the wrong way before I pin and sew.

As I was sewing and pressing, I continued to spray starch on this block, so that I could have better accuracy with getting my points to line up. I’m not sure I was entirely successful, but I decided it was good enough for me. I used to be really uptight about getting all my points to be PERFECT, and would rip and re-sew things multiple times sometimes, just to get everything to line up. In the past few years I stopped doing that so much, and now just enjoy!

This is also where you might choose to press the seams open, since there is quite a bit of bulk where the flying geese and the center diamond meet up. I pressed mine to the sides like a mad woman, lol!

Hopefully if all went well, this center unit should measure 8-1/2” square, and is ready to sew on our border pieces. We are going to get SO good at making these quilt block borders!

DONE!

And, of course, we have an additional eight sashing strips to make…

If you want to be sneaky, you could even use your extra fabric to make a few extra, since you know that you’ll be making more anyway. I promise I won’t tell!

Well, that’s all for this month. Yay, we did it! Thanks for stopping by, and please either comment below, or shoot me an email if you have any questions.

Happy Quilting everyone!

Kristin


Ruby BOM – Month 9
4.5.2022

It’s me again! This month we will get to make another four unique blocks, and this time three are repeats, and one brand spanking new. Since by now, we should all be pretty familiar with the techniques used in these blocks, I decided to skip over the lengthy tutorials that I’ve covered in months past. But it’s always good to see what these blocks look like sewn up in their new fabrics, so let’s dive right in!

Block #1

Now that it’s month 9, we FINALLY get to make the first block in the quilt. It’s about time! Technically, we made this same block WAY back in month 1, and it was block #14 then. And why didn’t I switch those and sew block #1 in month one and block #14 now, you ask? The short answer is FABRIC. When I’m planning block of the Month patterns, I need to pay attention to which fabrics will be shipped with which blocks, so blocks with like fabrics get grouped together. So now you know why things sometimes seem out of order. It all works out in the end though!

Speaking of being out of order, when sewing up this block, I began by making all of my flying geese and half-square triangles at the same time for this block. As you can see below, they are finished and ready for trimming, using my Bloc-Loc ruler to trim the flying geese units. Since you’ve all made these a million times by now, like I said earlier, I won’t bore you with the details.

Once those were all finished and trimmed, I was able to get busy assembling the block. Here is the center portion of the unit, which I’ve laid out to begin sewing.

Next, we’ll take the remaining flying geese as well as some Half Square Triangles, then sew those together as shown in step 7. Make sure you press the seam inward toward the flying geese unit on each side so that your seams will nest.

Now, all we have to do is sew those units to the sides, add our G squares to the remaining two units, and then get those sewn to the top and bottom, and the block is finished!

Block #5

This block is our only new one for the month. And this also means, that since it is new, we will be making it again in month 11, so be prepared.

Right off the bat, we are making even MORE no-waste flying geese – in two colorways no less. Once you have both sets completed, you’ll sew them together like it says in step 5. Here is what that looks like in real life:

Next, you’ll make some more Half Square triangles – big ones this time. Always remember that you are free to cut out your pieces just a smidge bigger so that you have wiggle room to trim as needed.

And now we can sew all the units together 9-patch style. Follow the directions and make sure that all your flying geese are pointing inward toward the center square. This was one of those blocks where the seams can get a little bulky, so if you aren’t comfortable with that, remember that you can always choose to press any seams open to reduce that bulk. Otherwise, follow the pressing arrows and you should be just fine.

Block #12

This block is another repeat from month 1 and was known as block #21.

We start by making a simple 9-patch unit for the center like so:

Next, it’s some more of those flying geese we know and love so well. Two of the completed flying geese units will have an F square sewn to each side, and the other two will have the longer G rectangles sewn to the ends.

Now, all that’s left is to sew those to the center unit like you see above. Easy Peasy!

Block #24

For our last block of the month – our ONLY block in our month 9 installment that doesn’t have ANY flying geese! How did that happen?! We made this block previously in month 5 as block #9 in case you want to refer back.

Begin by making some Half Square Triangles as directed.

Now you’ll use those HSTs to make a simple 4-patch unit like so:

After sewing the E and B strips together, you’ll have everything you need to assemble the block.

Here is my block, laid out and ready to sew together.

How easy was that? Another four blocks in the books!

Do you all realize that we only have one more month of Irish Chain blocks, and one last month of four unique blocks, then we are ready to finish our quilt?! We are SOOOO close to the finish line!

I hope you all have a wonderful, happy, and quilt-filled month!

Until next time…

Kristin


National Quilting Week Questions
3.15.2022
National Quilting Week has inspired us to explore our co-worker’s quilting journeys. 

Darlene is our Fabric Assistant and overall maven in the sewing room, and everywhere else for that matter. We asked her some questions about her quilting journey and here are her answers: 


How did you start quilting?

I have been sewing clothes and purses since I was in high school in the mid-’70s.  Quilting seemed so laborious at the time since all the instructions were to cut your templates from cereal boxes, trace onto your fabric and cut with scissors. I attempted it but soon lost interest.  Speed forward to the ’80s, I started working at Patagonia in Ventura Ca, and happened on a large quilt show.  I was amazed at the vendors selling rotary cutters and rulers with mats.  I just had to have a set! Although my first patchwork quilt with these new tools was a cover for my down comforter (which I made from a Frostline kit) it was made from 6” squares from fabric I had leftover from my garment making, fabrics from a sportswear company I worked for in Seattle and new fabrics from the quilt show.  I spent time arranging the scraps in a gradation from light to dark, much like the “watercolor” quilts designed years later.  After that, I started challenging myself with snails trails and log cabins blocks.  Then I discovered foundation miniature quilts… which was my next adventure in quilt making.
 

What is your favorite quilt-related project to date?

My favorite quilt would have to be the Wyoming Whirligig quilt I made in the early 2000s.  I made it as a replica of one we had when I was a kid.  Apparently, it got destroyed so I made another one.  It still needs to be quilted but I love the way it looks.

What does quilting mean to you?

Quilting is a colorful creative outlet for me besides the clothing I make.  Sewing and quilting construction comes very naturally to me, and I like to challenge myself to new patterns or blocks.  I love to put on my favorite music or podcast and sew for as long as I can. Watching all the fabric I cut into small pieces, come back to life in a new big, or small, quilt top.  The feel of the fabrics, the colors, the seams.  Hand stitching around the binding knowing that is the last step and when I make that last knot and bury the thread….I can crawl under it and take a nap.

What do you wish you knew when you started quilting?

I wish I had not bought so much fabric and learned to be more selective…once I buy fabric, it is hard for me to get rid of it thinking I might need it, just that perfect piece or color for a future quilt. 

What is your next project?

I have so many next projects…..I love traditional piecing, modern piecing, and fabric collage quilts.  I have a couple of each already started…so I have to finish one of those before I can start a brand new quilt.

What is your dream project?

The project I dream most about is one that has piecing, and applique, and might tell a story. I want it to be a medallion quilt with a center vocal point, then blocks and applique around it in borders.


Bunny Bag!
3.10.2022

Hop into Spring with this adorable treat bag in the shape of a bunny! Perfect for stashing your candy and decorating. The pattern comes with a template and full instructions on how to make your very own bunny.  

This project can be completed in a day and can be made using 10″ precuts, a couple of FQs, or other larger scraps you may have. *You may need additional fabric for the drawcord.*

This pattern uses boxed corners so that your bag can be free-standing. If you have never made something with boxed corners, have no fear, the pdf has detailed instructions.

The Bunny Bag also uses a small opening in the liner to turn everything right side and keep the seams super neat.

What you need:

Rotary cutter

Ruler

Paper and fabric scissors

Sewing machine

Thread

Pins and/or wonder clips

Safety pin or bodkin

Enough fabric to cover the template
 
🐰🐰🐰
 

Carrot Treat Bag
3.1.2022

Welcome Spring and Easter with this adorable treat bag in the shape of a carrot! 

This project can be completed in a day and can be made using 10″ precuts, a couple of FQs, or other larger scraps you may have.

If you plan to use 10″ square precuts ensure you have two of each square for the template. 4 10″ squares will only be enough fabric for the bag but you will need additional fabric or ribbon for the drawstring. Another option is to shorten the drawstring to 18″ if that works better for your scraps!


What you need:

Rotary cutter

Ruler

Paper and fabric scissors

Sewing machine

Thread

Pins and/or wonder clips

Safety pin or bodkin

Enough fabric to cover the template

🥕🥕🥕

Download the pattern and template here: Carrot Treat Bag Pattern and Template


Ruby BOM – Month 7
2.7.2022

Hello friends!

This month we get to make another 4 unique blocks. Yay! And once again, some of them may look a little familiar. That’s because three of the four blocks for this month are ones we’ve sewn before. The only block this month that is brand spanking new is block #23. So I’ve decided to go a bit out of order for this blogpost and start with our new block for the month. Let’s dive in!

Block #23

This block begins with making some no-waste flying geese. By now, you know the drill on how to make these, but here are a few pictures to refresh your memories.

Once those are sewn and trimmed, I lay out everything for step 3 before I begin sewing the components together. I have a love/hate relationship with blocks that have the flying geese sewn outward to make a square in a square effect. I love using this block in designs, but sometimes when sewing it can be tricky to get those flying geese to match up in the corners and make a smooth-looking diamond shape in the block. So I really pay attention to how things are lining up as I’m pinning, and yes, I use LOTS of pins to keep everything in place for sewing.

Once you have the center section sewn together, it’s time to make even more flying geese.

 After those are done, I again lay everything out before I begin sewing. I always do this, and mostly it’s because way back when I first started quilting I would confuse myself and end up sewing things going the wrong way, so this helps me to see what I’m about to do before I start pinning. Because nothing is more aggravating than thinking you’ve finished sewing your block, only to realize that you did it wrong and have to rip it out. Ugh!

You can see in the picture below that I already sewed the F squares to the ends of the D/E flying geese. Sometimes I get ahead of myself!

Almost finished…

This block is also one that no matter which way you press the seams, you’ll end up with some bulk in spots. If this bothers you, feel free to press the seams open for steps 6 and 7. Personally, I just pressed the heck out of those seams according to my instructions. But if you want to adjust, by all means, feel free. Once your quilt is done, no one will see how you pressed anything anyway.

I really love how this block turned out. In fact, a loooong time ago, I even designed a whole quilt using this block as the base for my design.

Okay, now let’s go back to the beginning of the pattern and talk about the not-so-new blocks we’ll be making this month.

Block #2

This block is the same as block 15 from month 3, so you can refer back to that blog post HERE if you’d like a refresher. But it’s always good to see how this block comes together with the new fabrics, so I’m posting a few pics of how this month’s version comes together.

Here are the squares for the center 9-patch, ready for sewing.

After I made the 9-patch unit, I sewed the HSTs for the corners of the block.

Here are all the components of the block, ready to sew into rows.

Block #4

We originally sewed this block way back in month 1, and it was block #16, in case you want to refer back. The only slightly tricky thing about this block is making those quarter square triangle blocks, and making sure you’ve got everything in the right place as you sew and cut.

First, you’ll make your half-square triangles.

After those are done, you’ll pair up one of each kind and place them right sides together. They aren’t lined up in the photo below on purpose so that you can see how the Red Corsage II fabrics on the bottom and top units are to be on opposite sides. While I normally would trim my HSTs before sewing, when making Quarter Square triangle units, I always wait until I’ve finished them before trimming. That’s why you still see the tails in the photo.

If they are placed properly, you should be able to peel back the top unit and it should look like this:

I’ve skipped ahead a bit here, but this is what they should look like after you sew on either side of your marked lines and cut on the line. Now all you have to do is press them open and trim them to size.

Now you just have to lay the block out, sew the units into rows, like I’ve shown below, and then sew those rows together. Easy peasy!

I have always loved Ohio Star blocks. They are quick and easy, and just darling in quilts. The first quilt block I ever made in my whole life was an Ohio Star block, so maybe that’s why I adore them.

Block #11

Our last block for this month is another repeat from month 3 and was known as block #6 back then.

This block has lots of half-square triangles around the perimeter of the block, along with some more flying geese to make the center star points. The day I was working on this block I was listening to podcasts, as I tend to do while sewing, and got so engrossed in what I was listening to that I got a little carried away and kept forgetting to take pictures for all of you. Ack! So what you see below is what I have to show you. I’ll do better next month, I promise!

Here is the center star at about step 3, almost finished.

The top and bottom rows of the block are just about finished as you can see here:

And now the block is almost done!

This one is another personal favorite of mine, even though it’s a lot more work than the Ohio Star block. I really do need to make an entire quilt with this block. I know I would love it!  Perhaps I’ll make an FQ sampler…in my spare time haha! For now, I’d better just focus on getting this quilt finished, along with about 5 others that are partially done in my UFO pile. So many projects, and so little time!

Here’s one last look at all the completed blocks. I love them, and I hope you do too!

I hope you enjoyed putting this month’s blocks together, and I’ll catch you all next time!

Happy Quilting!

 Kristin