Tag Archives: tool review

Kwik Klip
4.11.2017

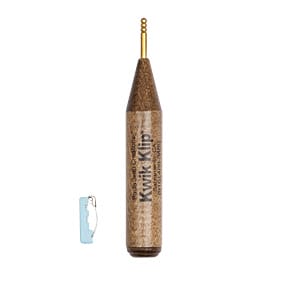
Featured Tool: Kwik Klip by Paula Jean Creations, Item #82219
What is this tool typically used for?

This tool is for anyone about to use safety pins to baste their backing, batting, and quilt top together.

Upon first glance, what were your initial thoughts?

At first glance it looks like a giant seam ripper.

How did you use it?

I took my safety pins and and inserted them down into the three quilting layers, coming up through the top. Then, I took the Kwik Klip and gently pushed the sharp end of the pin up and into the pin chamber.

What do you like best about the Kwik Klip?

I love that it was much easier to use than I thought it would be! It’s comfortable to hold, and goes pretty fast. Plus, it only took a minute to learn how to use it.

What did you like the least?

Nothing.

Why do you NEED one?

It’s fast, safe, and easy to use! Plus, it puts less stress on your hands and fingers–this would be great for anyone who has to work with a lot of safety pins on a regular basis. I recommend this tool for sure. There are also pin covers that go with this tool called Quilter’s Delight Safety Pin Grip Covers, #82218.


Black Gold Needles
3.28.2017

Featured Tool: Black Gold Needles – Appliqué Sharps by Clover

What is this tool typically used for?

General hand sewing.

How do you use them?

I use the Black Gold Needles for binding and when I am doing hand sewing. They’re great!

What do you like best about the Black Gold Needles?

I really like these needles for hand sewing and especially for binding. They are thin and glide through the fabric nicely. They also don’t bend as easily as some of the other needles I have used. Package 21201 has two needles of each size: 9, 10, and 12. It’s a great way to try them out and see what size works best–it’s usually dependent on the fabric you are sewing on and personal preference. The special black plating on the surface allows the needle to pierce effortlessly through fabric, enabling sewing with little resistance.

What did you like the least?

They are a little harder to see if you drop one.

Why do you NEED them?

Because we all need lots of needles.

Who would appreciate the Black Gold Needles – Appliqué/Sharps most?

These are perfect for:

  • Beginner, Intermediate and Expert quilters
  • Embroiderers, Paper-Piecers
  • Someone acquiring “the basics”

Chaco Liners
3.7.2017

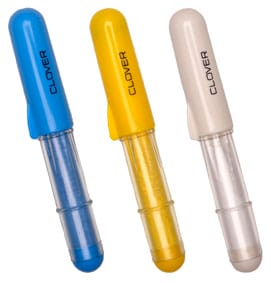
Featured Tool: Chaco Liners by Clover

What is this tool typically used for?

This tool helps trace lines perfectly to mark fabric prior to sewing or quilting.

What were your initial thoughts?

Well, I’ve known and used these for years now, but at first glance I thought they were just short and fat markers.

How did you use it?

First, I aligned my ruler onto my finished quilt top. I then ran the Chaco Liner down the side of the ruler to mark a straight line in preparation for quilting. You can also mark organic lines too (without a ruler).

How did using it go?

Wonderful! I love using these markers because they are chalk-based and it easily rubs off.

How long did it take you to learn how to use it?

Instantly.

What did you like best?

I love that it comes in three colors: yellow, blue, and white. No matter what color of fabric I’m working with, I can find a liner that shows up well. The chalk comes out easily and plus they are easy to hold.

What did you like the least?

There’s nothing negative to note about these liners!

Could you see another potential use for Chaco Liners?

You could use it for apparel marking and general sewing.

Why do you NEED it?

If you want a simple, easy-marking tool in a variety of colors, these Chaco Liner Pens are awesome. They are our go-to marking tool by our staff sewists.

Who would appreciate Chaco Liners most?

These are perfect for:

  • Beginner, Intermediate and Expert quilters
  • Anyone looking to acquire the basics

Hang It Dang It
2.21.2017

Featured Tool: Hang It Dang It by Innovative Solutions, Item #82328, 82131

Connecting Threads Reviewer: Ann

What is this tool typically used for?

Hanging quilts of various sizes on walls. The larger one can hang quilts between 35″ and 68″ and the smaller 21″ to 40″.

How did you use it?

I hung a 41″ square quilt in our bedroom with the larger Hang It Dang It.

How did using it go?

The Hang It Dang It does require a sleeve – which my quilt already had. The instructions were simple for centering the quilt on the rod. I did have a little trouble hanging the quilt at first. There is a grooved area nailed to the wall for the rod to clamp into. The rod fit well but the fabric of the sleeve bunched up so the quilt did not hang evenly. I found that making a small slit in the sleeve allowed the rod to fit in the clamp directly without any fabric involved.

How long did it take you to learn how to use it?

It took a bit to figure out the issue mentioned above – but overall it was quick and easy to install.

What did you like best?

One nail in the wall works for either size of hanger- and the flexibility to display wall hangings of different sizes as well.

What did you like the least?

Having to fuss a bit with getting the quilt to hang straight without bunching up the sleeve. It is so easy to fix with a little slit in the sleeve or making a two-part sleeve that it is a non-issue.

Could you see another potential use for Hang It Dang It?

It will hold up to 40 lbs so perhaps there are other applications, such as tapestries or banners.

Why do you NEED it?

The Hang It Dang It is a quick, flexible, and easy way to hang quilts up to 68″ wide. It is especially useful for quilters who like to change their wall hangings with the seasons, as new projects are completed, and with changes in decor. Having the two sizes increases the possibilities.

Who would appreciate a Hang It Dang It most?

These are perfect for:

  • Beginner, Intermediate and Expert quilters
  • Anyone eager to display a finished project!

Embroidery Hoop
2.7.2017

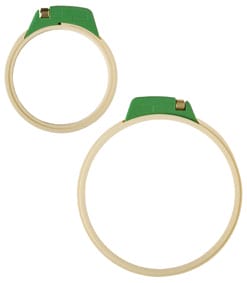
Featured Tool: Embroidery Hoop by Clover, Item #82034, 82035 

What is this tool typically used for?

Keeping your fabric taut while you embroider. There is both a small (4-3/4″) and large (7″) size.

Upon first glance, what were your initial thoughts?

It has a very sturdy appearance; it’s made of thick plastic with a bulky, metal screw.

How did you use it?

I loosened the metal screw to separate the two hoops, which left me with an inner and an outer hoop. Then, I placed my fabric evenly over the inner hoop. The outer hoop was placed around the inner hoop and I pulled my fabric to tighten it. I adjusted the screw to keep the hoops and fabric tight and in place. Once it was set up, I was able to embroider a design onto the fabric.

How long did it take you to learn how to use it?

It took no time at all to learn to use. It is used exactly like any other embroidery hoop except it is sturdier and more solid.

What did you like best?

I liked how easy it was to tighten the screw, it is a very large metal screw. And I liked how it kept my fabric very secure and in place.

What did you like the least?

I was hesitant to use a plastic hoop, because I thought the fabric would slip – but it did not! I liked everything about this embroidery hoop.

Why do you NEED a Clover Embroidery Hoop?

You need it because it takes out all the problematic tension issues I’ve experienced with inferior hoops. It also made transporting my embroidery work easy because I could throw it in my bag and not worry about the hoop falling apart. It kept my work in place and very secure.

Who would appreciate a Clover Embroidery Hoop most?

These are perfect for:

  • Embroiderers
  • Someone acquiring the basics

Wonder Under
1.17.2017

Featured Tool: Wonder Under by Pellon Consumer Products, Item #21206 

What is this tool typically used for?

Wonder Under is ideal for applique–it allows fabric to maintain its soft feel after fusing. It is also machine stitchable, fuses easily in seconds, and bonds to fabric or any porous surface.

How did you use it?

Since it is so light weight, it is really easy to trace your applique shapes. You need to remember to trace the mirror image of the pieces especially when applique letters. Because it comes on a roll, you can applique large pieces with only one sheet, which you can do when you are using the pre-cut sheets. Sometimes the paper can be hard to peel off especially on small pieces. I find scoring the back of the paper with my scissors really can help.

How long did it take you to learn how to use it?

The fusible part is super easy to use, but if you are having a hard time peeling off the paper, make sure you let it cool first.

What did you like best?

It is light weight so when you are sewing through it for finishing the edges or quilting it is easy and doesn’t gum up your needle. Also it is nice if using several different layers of applique.

What did you like the least?

Sometimes the paper is a little difficult to peel off, but for me the quality and light weight of the fusible is really worth a little difficulty.

Could you see another potential use for Wonder Under?

It can be used any where you would need a double sided fusible, including some crafts.

Who would appreciate Wonder Under most?

These are perfect for:

  • Intermediate and expert quilters
  • Someone acquiring the basics

Hold It Precision Stiletto
1.10.2017

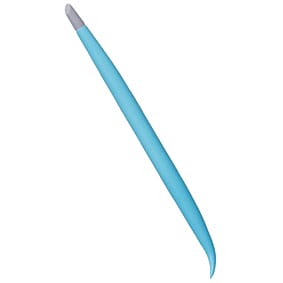
Featured Tool: Hold It Precision Stiletto by Clover, Item #82173 

What is this tool typically used for?

No more hot fingers! This is the perfect tool for pressing and sewing! Use the curved end to hold fabrics while you sew, and the rubber grip end when you are pressing. It’s also a great tool to use with a hot glue gun.

What was your first impression of the Hold It Precision Stiletto?

I liked the curved aspect to the stiletto end and the rubber end for ironing. I also use the curved end to poke out corners when I turn a project.

How did you use it?

I use it mainly as a stiletto. I love it! Because the end is curved with a point it is a lot easier to use than other stilettos.

How long did it take you to learn how to use it?

Figured it out on my first try.

What did you like best?

The curved end makes getting the right grip on your fabric a breeze.

What did you like the least?

My silicone end has started to crack a bit.

Why do you NEED it?

You need this tool to help hold down seams while going through the presser foot. It is very helpful in helping you keep your fabric straight while sewing. The silicone tip saves fingers from getting burned, but also works as a stiletto while sewing.

Could you see another potential use for the Hold It Precision Stiletto?

I also use it to push out corners when turning an object

Who would appreciate the Hold It Precision Stiletto most?

These are perfect for:

  • Beginner, intermediate, and expert quilters
  • Paper-piecers
  • Someone acquiring the basics

YoYo Makers
12.13.2016

Featured Tool: YoYo Makers by Clover, Item # 81857, 81858, 81837, 81838

What is this tool typically used for?

The YoYo Makers are for making cute, sewn (cinched) fabric embellishments.

What was your first impression of Clover’s YoYo Makers?

They look like Mickey-Mouse ears!

How did you use it?

You cut fabric to fit 1/4″ around the plastic yo-yo maker, place the fabric inside, and snap the lid on. Yo-yo makers are a guide for stitching around your fabric so that when you cinch or pull the thread to tighten your yo-yo, the stitches are even. It also provides you something to hold onto. You’ll end up with a very nice yo-yo.

How long did it take you to learn how to use it?

Just a minute or so!

What did you like best?

I love using these yo-yo makers, it’s pretty fast and you can really crank out some yoyos in no time at all. There are four different sizes available: extra small, extra large, small, and large.

What did you like the least?

Nothing negative stood out to me about this tool.

Why do you NEED it?

They are FUN to use and super easy.

Who would appreciate YoYo Makers most?

These are perfect for:

  • Beginner, intermediate, and expert quilters
  • Someone acquiring the basics

Double-Sided Multi-Craft Carrier
11.15.2016

Featured Tool: Double-Sided Multi-Craft Carrier by Creative Options, Item #82068

dsmccarrier

What is this typically used for?

This is a carrier for quilting and craft supplies.

What was your first impression of the Double-Sided Multi-Craft Carrier?

What a great way to store our Essential Threads!

How did you use it?

Storing my assortment of Essential Threads spools.

How long did it take you to learn how to use it?

Instant – open it, put in spools, and close it up.

What did you like best?

Double-sided = double the storage. It is see-through so I can see what colors are in it. I have two carriers and my threads are arranged by color (like a rainbow). It is easy to see which colors are in each side. They can stack or sit upright. It closes securely and has held up to lots of use.

What did you like the least?

I need a third one – but that is not the carrier’s fault!

Why do you NEED it?

It stores my thread safely and easily. I love that my thread is now protected from light and dust.

Could you see another potential use for the Double-Sided Multi-Craft Carrier

It is a multi-craft carrier so other craft supplies could be stored in it. I am thinking about getting one to store my spools of pearl cotton and maybe embroidery threads. Perhaps scraps, EPP pieces like hexagons, or cut strips of various sizes for a Log Cabin or other scrappy quilts.

Who would appreciate the Double-Sided Multi-Craft Carrier most?

These are perfect for:

  • Beginner, intermediate, and expert quilters
  • Embroiderers
  • Someone acquiring the basics

Mighty Travel Iron
11.1.2016

Featured Tool: Mighty Travel Iron by Dritz, Item # 82350

travel-iron

What is this tool typically used for?

Ironing on the go or a small iron to keep next to your sewing station.

What were your initial thoughts?

That it is small, portable and probably great for travel. I like that it has a steam function and comes with a travel pouch.

How did you use it?

I used it on small projects and travel ironing.

How did using it go?

It worked best on small surfaces. The steam function actually lasted for quite a bit. It got hot very quickly and ironed really well. I had to be careful with filling it – otherwise it will overflow and leak. Cord sometimes gets in the way of ironing, so best for smaller projects or quick ironing.

How long did it take you to learn how to use it?

It was pretty quick to pick up and use.

What did you like best? Least?

The travel pouch and the steam function. The cord could be longer.

Why do you NEED it?

Since I travel with projects, it is nice to be able to press with steam. And if I work on small projects, I don’t have to use such a big iron.

Who would appreciate the Mighty Travel Iron most?

These are perfect for:

  • Beginner, intermediate, and expert quilters
  • Paper-piecers