


 Tutorials
 4.21.2023
I’m a big, big fan of projects that are both easy and useful. I know this isn’t groundbreaking, but I’ve encountered a lot of projects lately that are only one or the other: easy OR useful, not both. It can be frustrating to put in a day’s work on a project, just to turn around and realize that it’s not going to fit into your daily routine.
This Quilter Utensil Case is my easy AND useful pattern: it can be whipped up in a day, it’s a fabulous beginner project, it’s highly customizable and it has endless uses. Since I sew a lot of samples to perfect sizing and technique, I’m swimming in these cases right now. Currently, every single sample is being used in some way: a utensil case, a reusable straw case, a rotary cutter case, a pen case, a scissor case, a cord case, the list goes on and on! Using the basic sewing formula in this pattern, you can adjust width and height to create any size you want. It’s fantastic!
Ready to make your own Quilted Utensil Case? Let’s go!

Materials:
- 2 pieces of fabric that measure 5” x 21” – one for the outside, one for the lining
- FQs work well here, as they’re approximately 18” x 22”
- Annie’s Soft & Stable Batting
- This is the best batting for sturdier bags! If you don’t have it, any batting scrap that measures at least 7” x 23” will work. Remember, your fabric will be 5” x 21”, so it helps to have some extra batting around each side of your fabric.
- 2 – 1” pieces of Velcro
- Essential™ Cotton thread
- Marking tool of choice
- I love the Ultimate Marking Pencil or the Chaco Liner Pen in White for darker fabrics. I love the Clover Air Erasable Marker for lighter fabrics.
- SpraynBond Basting Adhesive (optional)
- 5” circle template (optional)
- This is to create the curved flap that you see in my samples. Skip the template and step if you’d prefer a squared flap!
- Basic sewing tools:
- Pins and/or Wonder Clips
- Rotary cutter
- Cutting mat
- Large ruler (the Omnigrip Neon Ruler – 6 x 24 is phenomenal for this!)
- Sewing machine
- Sharp fabric scissors

Before we dive into instructions, there’s a free, downloadable PDF here!
Directions:
1. Cut your outside and lining fabrics.
- Each piece should measure 5” x 21”.
- If you’re creating the half-moon shaped flap, grab a 5” circle template. Line it up against one 5” side of your outside fabric. Mark a half-moon shape around your template, then cut along that line. Repeat the process with your lining fabric.
2. Cut your batting.
- Cut one piece of Annie’s Soft & Stable that measures 7” x 23”. This gives you about an inch around each edge of your fabric to make quilting easier.
3. Adhere your outside fabric to your batting.
- Use the SpraynBond Basting Adhesive to attach your outside fabric to your batting.
- If you’ve never used Basting Adhesive, here’s a simple step-by-step:
- Start by laying your outside fabric, right side up, on your batting.
- Lift up about half of your fabric off the batting, then spray your adhesive on the batting where your fabric was just laying.
- Slowly press your fabric down on the adhesive, carefully smoothing it out to avoid wrinkles.
- Repeat this process for the other half of your fabric – lift up, spray your adhesive on the batting, press your fabric down and smooth it out.
- It doesn’t need to be perfect, it just needs to hold your batting and fabric together for the quilting step!
4. Mark your quilting lines.
- Get your marking tool of your choice, like the Clover Air Erasable Marker, and your batting/outside fabric. Mark the lines you would like to quilt.
- It’s recommended to have quilting lines every 1-2”. The design is up to you!
5. Baste the edge of your fabric.
- Using a basting stitch, sew ⅛” away from each edge of your outside fabric.
6. Quilt your outside fabric & batting.
- Using a standard stitch length, quilt along the markings you made in Step 4.
- Using a Walking Foot makes a huge difference, so if you have one in your sewing kit, now is the time to use it!
- This is the outside of your case, so remember to have fun – a brightly colored thread can make a huge impact!
7. Cut the excess batting around the edge of your outside fabric.
8. Sew your lining to your outside fabric.
- Take your lining fabric and your outside fabric (which is quilted to your batting) and place them right sides together. Sew around the entire edge using a ¼” seam allowance, leaving a 4” opening along one long side. This is where you’ll turn your case right-side out.
9. Turn case right-side out.
- Pull your case right-side out using the small 4” opening you left along the outside.
- Once your case is right-side out, take a tool like That Purple Thang to turn out your corners more efficiently.
10. Attach the Velcro.
- Fold your case, lining sides together, into position: this should leave the small, half-moon shape you created open at the top of your case. I folded the squared end up about 9”, creating a 2 ¼” flap. See the photo bellow for reference:

- Before sewing the sides closed, attach the Velcro. Measure where you would like it to be on the inside of the flap and the outside of the case. Make sure those 2 spots line up when you fold the flap over, as this Velcro keeps your case close.
- Unfold your case, take your 1” pieces of Velcro and pin them in place. Sew around the edge of each piece of Velcro using a ⅛” seam allowance.
11. Sew the sides of your case closed.
- Fold your case, lining sides together, back into position. (Check the reference photo from Step 10.)
- Tuck in the seam allowance of the 4” opening where you pulled your case right-side out. It helps to iron it, then immediately pin or clip the seam in place!
- Pin or clip your sides in place. Sew a scant ¼” seam allowance around the entire case.
- You can just sew along the 2 sides, leaving out the flap. I liked the finished look of the seam around the entire case, but it’s entirely up to you! Look at the photo below for reference – you can see the black seam around the edge of the half-moon flap:

12. Your Quilted Utensil Case is Done!
Tips:
- Don’t have circular templates? Don’t worry about it, you’ve got templates all over your house! You can try mason jars, cups or mugs of any kind, candles, bottles, vases, or random jars. It doesn’t need to be perfect, as long as it’s pretty close to your cut fabric width.
- In place of Velcro, large snaps or magnetic clasps work well. If using magnetic clasps, it’s always smart to double check that they won’t attract your silverware/objects.
- To adjust the size:
- Let’s say you want to create a case that’s 6″ tall. You’ll want to double that (for the front and back of the case), add about 2 1/2″ for the flap, then add 2 x 1/4 seam allowances. 6 + 6 + 2 1/2 + 1/4 + 1/4 = 15. The height of your fabric cut will be 15″.
- Adjusting the width of a case is even easier! Want your finished case to be about 6″ across? Just add 2 x 1/4 seam allowances, which comes out to 6 1/2″. That’s it!
- For this imaginary 6″ x 6″ case, your final cut size should be 6 1/2″ x 15″.
- For the curved flap, you’ll want a 6 1/2″ circle template – remember, you cut your half-moon shape before it’s be sewn together!
For a taller, thinner case (the scrappy version to the left):
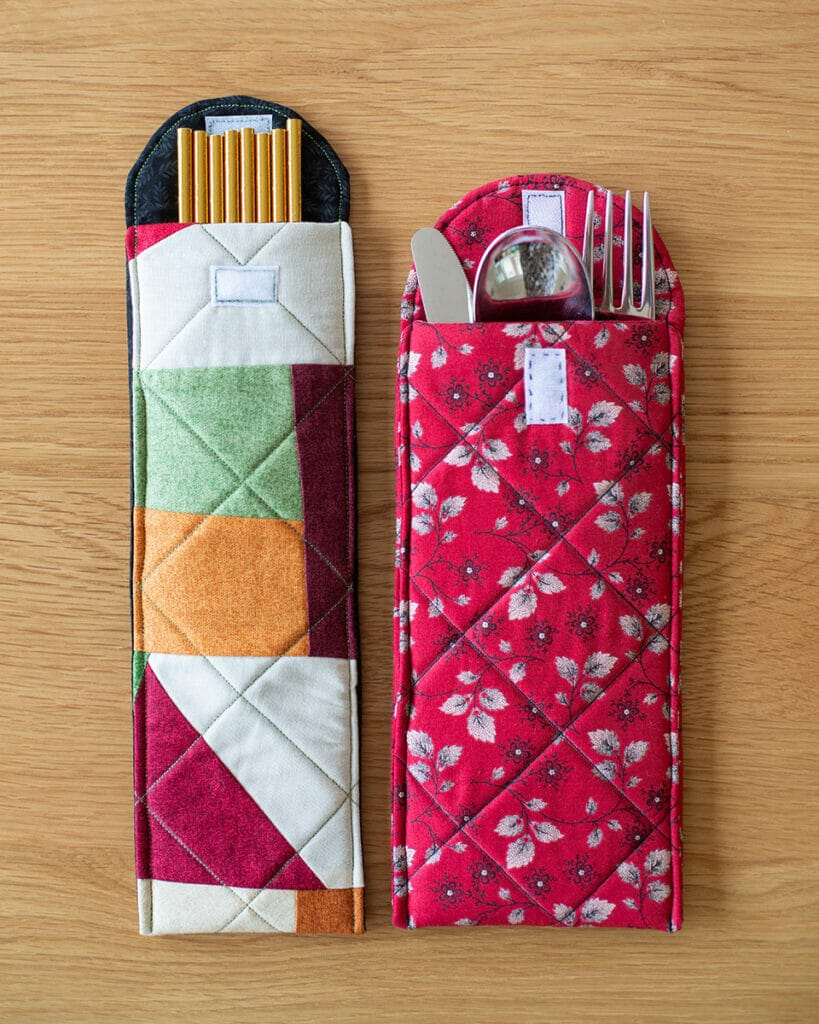
- Cut 2 pieces for the outside and lining: 4” x 24”. This is not FQ friendly, so you’ll need larger pieces of fabric.
- Cut 1 piece of batting: 6” x 26”.
- Optional: a 4” circle template, if creating a curved flap.
- Everything else will be identical, but you’ll get a longer case that works better with chopsticks, steak knives and more!
You’re all done! I can’t wait to see what fun versions of this case you make – the possibilities are endless!
Happy sewing!

