I don’t know about you, but I’m a big snacker. Taking a car trip? Snacks! Heading into the office for a long day? Snacks! Taking the dog for a hike? Snacks! Marathon sewing on a sleepy Saturday? Snacks! I firmly believe there is no situation that couldn’t benefit from snacks.
As a longtime user of traditional, single use plastic snack bags, I knew it was time to find a replacement. After discovering that a lot of reusable snack bags are very expensive, I wanted to make a few of my own. These bags are the result – beginner-friendly, fun and customizable. Toss in your trail mix, your gummy bears, your granola bars, your chocolate, whatever snack speaks to your soul. Lined with vinyl, they’re easy to wipe out with a damp cloth and refill. I’m about 20 bags deep and can’t stop making them!
Don’t want to add another plastic item to your long list of plastic items? These work really well without the vinyl too, they just require more robust cleaning after each use! This is why it is SO important to pre-wash the fabrics here – these bags are meant to be used, which means they’ll need regular cleaning. If you don’t pre-wash your fabrics, when you finally get around to washing the bags, they’ll shrink up and potentially cause issues along the Velcro’ed edge.
Ok, the boring stuff is all done, let’s jump in!
Materials:
- Fabric for the outside, measuring 8” x 18”
- It’s very important to pre-wash your fabric! I know, I already mentioned it, but I’m telling you again – it’s that important here!
- Fabric for the lining, measuring 8” x 18”
- HeatnBond Iron-on Vinyl
- 7” piece of ½” wide or 1” wide Velcro
- Basic sewing supplies
- Essential™ Cotton Thread
- Rotary Cutter
- Cutting Mat
- Ironing Board or Mat
- Iron
- Sewing Machine
- Pins

Bag Sizes:
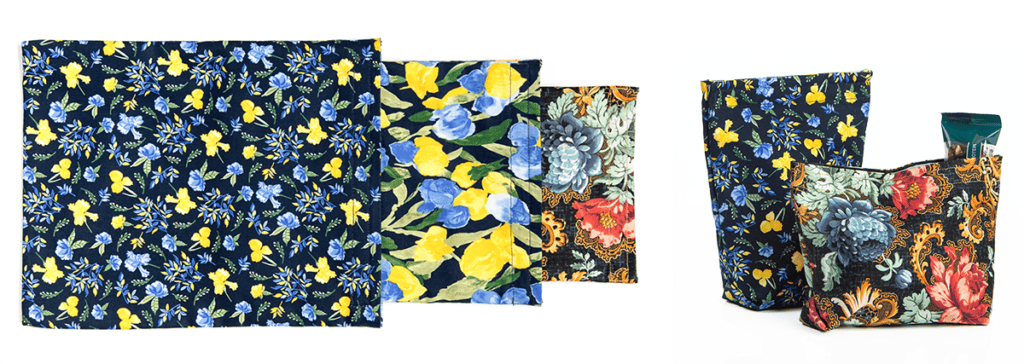
For this pattern, you’ll be making the Medium Flat Bag (above, second from the left), which requires 2 pieces of fabric measuring 8” x 18”. We created 4 other sizes: 2 flat bags and 2 with boxed bottoms, which help the bags stand upright while you fill them (pictured to the right up above). Below are the finished bag sizes and the fabric cutting measurements:
- Large Flat Bag – H: 9 ¾” W: 7 ¾” (above, far left)
- Fabric cut size – 9” x 20”
- Medium Flat Bag – H: 8 ¾” W: 6 ½” (above, second from the left)
- Fabric cut size – 8” x 18”
- Small Flat Bag – H: 5 ¾” W: 5 ¼” (above, third from the left)
- Fabric cut size – 6 ½” x 12”
- Tall Boxed Bottom Bag – H: 6 ¾” W: 5 ¼” D: 2” (above, second from the right)
- Fabric cut size – 6 ½” x 16”
- Short Boxed Bottom Bag – H: 4 ¾” W: 6 ¾” D: 2” (above, far right)
- Fabric cut size – 8” x 12”
Before we jump in: there’s a free, downloadable PDF here!
Directions:
1. Cut Your Fabric
- Cut your 2 pieces of fabric, one for the lining and one for the outside. This pattern centers around making the Medium Flat Bag, which requires 2 pieces of fabric cut to 8″ x 18″.
2. Prepare Your Lining with the HeatnBond Iron-On Vinyl
If you’ve used it before, just follow the basic package directions and forge ahead!
If you’ve never used it before, I made a quick video about how to apply it.
Prefer a written tutorial? Here is a detailed step-by-step:
- Lay out your lining fabric, right side up, on your cutting mat.
- Roll out the vinyl and cut a piece that’s about ½” bigger than your fabric.
- Take off the paper from the vinyl – this reveals a lightly sticky side that will cling to your fabric. KEEP THE PAPER!
- Place the vinyl, stickier side down (the side you just revealed), on top of your fabric. Slowly press it down evenly across your fabric.
- Cut off the excess vinyl around the edges of your fabric.
- Place fabric vinyl side up on your ironing board. Set your iron to Medium (or a Silk setting). Take the paper you peeled off and place it grid-side up over your fabric.
- Iron your fabric, one section at a time, for 8 seconds each.
- Let the fabric-vinyl cool for a moment, then flip it vinyl side down on the ironing board. Iron the fabric, one section at a time, for 4 seconds each. Make sure that you don’t have any vinyl hanging over the edge of your fabric here – the vinyl can’t be ironed directly!
3. Sew Your Pieces Together
- Take your outside and lining fabrics, and place them right sides together. This means the right side of your outside fabric will be facing the vinyl side of your lining fabric.
- Sew around all 4 edges of your fabrics with a ¼” seam allowance, leaving a 3-4” opening along an 18” side.
- Turn your fabric right side out through the opening you left. The vinyl can make this process tougher, so take your time!
- Vinyl side down, iron your seams flat. Take your 3-4” gap and iron down the ¼” seam allowance, making sure not to press the iron directly to the vinyl. (Leave the gap open for now, we’ll be sewing it together in a later step!)
4. Sew On Your Velcro
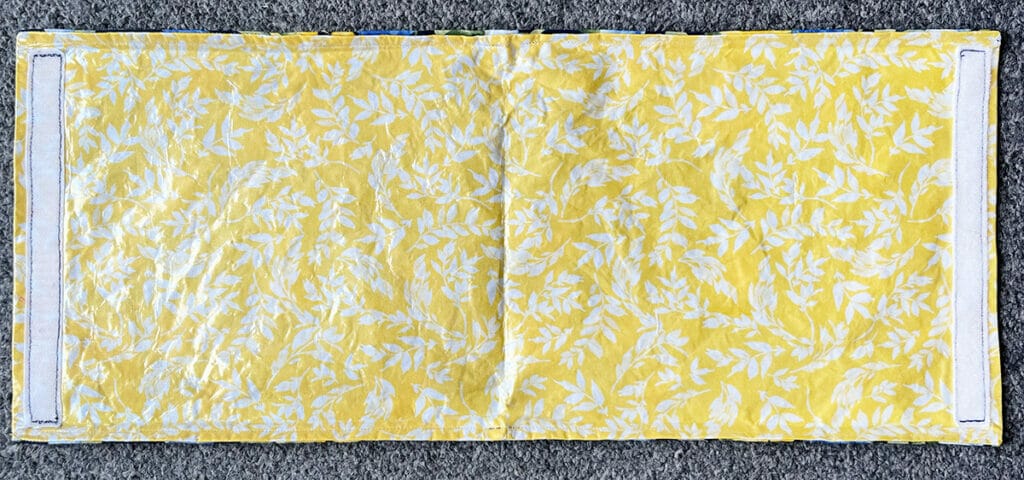
- Pin your Velcro strips on the lining fabric about ⅛” away from the edge of each 7 ½” side. You should have about a ¼”-½” gap on each side of the Velcro. You want that gap, as you’ll eventually sew the sides of your bag together – if the Velcro goes across the entire 7 ½” side, those side seams will be really tough to sew! (See the photo below for a visual reference.)
- Sew around the edge of the entire Velcro strip on both sides.

5. Finishing Sewing Your Bag
To create a flat bottom bag:
- Fold your rectangle in half along the 18” side, right sides together.
- Pin the 2 sides together, remembering to leave your velcro’ed opening unsewn.
- Sew down each side using an ⅛” SA. (You should have sewn your 3-4” gap closed during this step, but I like to double check!)
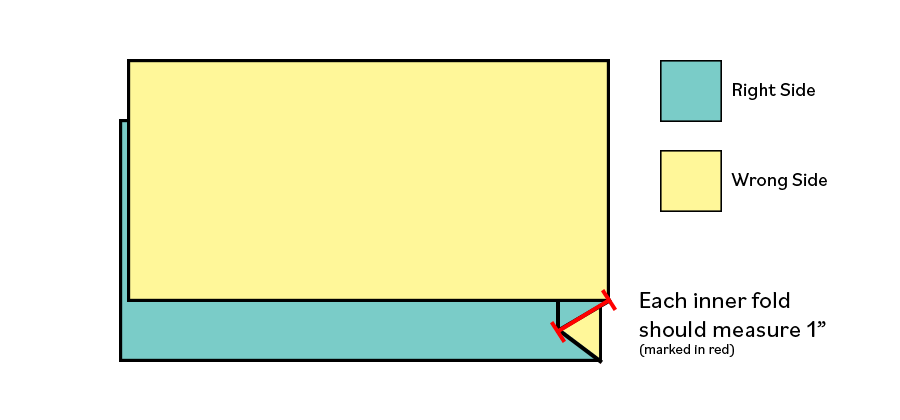
To create a boxed bottom bag:
Follow the folding diagram below:

- Pin the 2 sides together, remembering to leave your velcro’ed opening unsewn.
- Sew down each side using an ⅛” seam allowance. (You should have sewn your 3-4” gap closed during this step, but I like to double check!)
6. Turn your bag right side out, vinyl side in, and you’re all done!
Our Favorite Tips for Sewing Vinyl-Lined Snack Bags:
- Your finished snack bags can be easily wiped out for quick cleans. To clean the whole bag, toss it in the washer on a cold, gentle cycle, then line dry.
- Making a custom sized flat bottom bag is easy! If you’d like to create a bag that is 10” x 12”, for example, you’ll at ¾” to your width, ending at 10 ¾”. For your height, you’ll double the number and add ¾” (12 + 12 + ¾), ending at 24 ¾”.
- To make a custom sized box bottom bag, follow the instructions above BUT add an extra 2” to your height number. This compensates for the special fold you create for the box bottom!
- Box bottom bags are extremely useful! When filling them up with goodies, they stand on their own, making it easier to toss in your snacks.
I can’t wait to see how you use your snack bags! Don’t forget to tag us on Facebook and Instagram – we love seeing your CT projects!
Happy sewing!


 Tutorials

